If you are using an RF transmitter in your gun you MUST synchronize the loader and your gun
If you are using an RF transmitter in your gun, you will find that as soon as you have the gun fire, and the loader is turned on, it will spin.
Great, you're all good right? Well yes and no.
We do that so you can easily and immediately tell that your RF "link" is working.
But we recommend you synchronize the loader to the gun so that the loader doesn't accidentally run to someone elses RF transmitter.
First off you need to make sure RF is turned on. Refer to your manual (and I will make a video soon also) the blue led will blink once for RF off and twice for RF on.
Next have the gun turned on and set to fire (have the eyes turned off, make sure it's not gassed up, and that there is no barrel on the gun and no ball in the gun's breech).
Next push the motor adv/value button (on the far left of the buttons) and hold it until it goes from red to orange. Pull the trigger of the gun when it is orange and the led will change to show it's synchronized.
If you are using sound (NO RF transmitter) you MUST de-activate RF on the loader.
If you are NOT using an RF transmitter in your gun, you must de-activate the RF setting on the loader.
Why? well because if you don't, and someone else near you is using RF your loader will pick up their signal and think you want it to use RF. Then it won't run to the sound of your gun, but only to RF signals until you push the motor adv/value button to make it "listen" for the sound of your gun again.
Often people will not turn the RF off and will think their gun is jamming when it is not. This is characterised by "jams" that are cleared by pushing the motor advanced button once, or repeatedly.
When you push the motor advance button once the loader will stop using the RF only mode, and will listen for the sound inputs from your gun... but only until it gets a new RF signal then it will switch back to RF only mode... not good during play if you don't have an RF transmitter in your gun!
This feature is very useful inbetween games though or when creeping through the woods if you do have an RF transmitter, as you can push the button to stop the loader pulsing every few seconds, but as soon as the loader gets the RF signal from the first shot it will go straight back to working fully with the RF system.
If you push the motor advance button three times (quickly) the loader will stop using the RF only mode and only work on sound inputs until it's turned off and on again.
This is great if you have a faulty RF transmitter and get it fixed for the next game, but not good if you are only using sound, as you will need to do the three push thing every time you turn the loader on. That's a PITA and hence why we made it possible to turn off the RF completely.
Hence why we recommend if you are ONLY using sound activation with your Prophecy to turn off the RF feature until it's needed.
This is very easy to do.
1) Turn on the loader.
2) Push and hold the mode/select button until the LED next to the power switch flashed green rapidly.
3) Push the mode/select button until the LED next to the power switch turns blue. You should push the button three time to get this, but don't worry if you push it too many or too few times, just keep pushing it until the LED goes blue (it will scroll around the modes so you can just keep pushing it). The left LED (value) will flash the current setting while the blue LED (select) stays on. One flash is what you want and means the RF is turned off.
4) You can change the setting simple by pushing the Motor Adv/Value button the number of times corresponding to the setting you want. Push the button once to turn RF off, and then wait for it to flash once back to you. If you want RF on, push it twice, and wait for it to flash back to you.
Obviously since both DLX and Empire are now sponsoring Dynasty we've been looking to get our systems working together in Synergy for the best possible results.
One step towards doing this is working out how to neatly and nicely install the RF transmitter into the Luxe for use with the Prophecy loaders.
Below is an installation guide. Ultimately we will probably be making custom shortened wiring harnesses for Dynasty's guns to make it even quicker and easier to do this and provide maintenance, but this guide shows how to get it all to fit with the standard parts and wiring harness that comes with the Empire RF transmitter link.
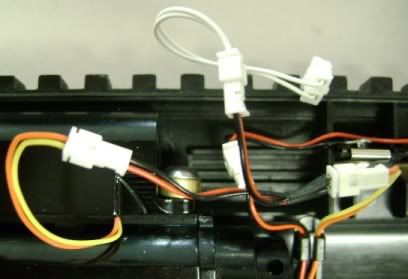
Empire RF Transmitter Installation (Luxe Marker)
• Make sure your marker is degassed and safe to work on.
• Remove the two grip screws on the left side of the marker and bend grip under trigger guard so it doesn’t get in the way.
• Carefully disconnect the solenoid from the Luxe’s circuit board.
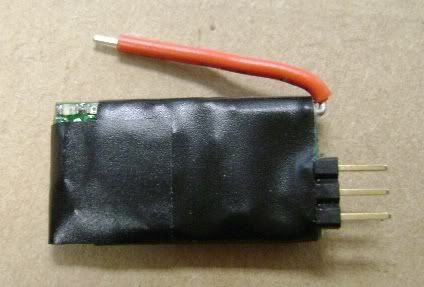
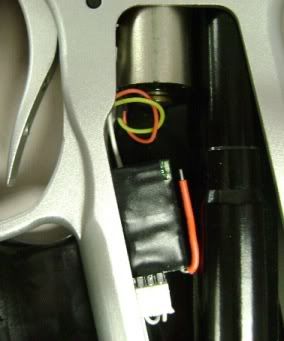
• Apply tape onto the Empire RF Transmitter as pictured. Try to leave the two LEDs uncovered, so you can check that it’s receiving a signal once installed.
• Gently bend the RF Transmitter’s antenna as pictured; it should be level with the board.
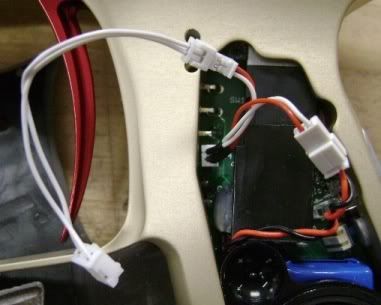
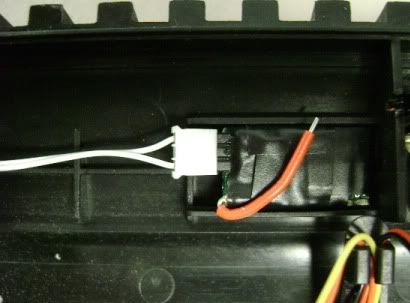
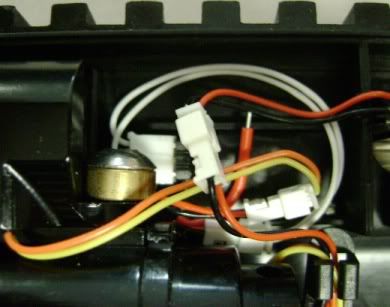
• Attach the correct included harness (one pictured) into the Luxe’s solenoid plug on the circuit board and then plug the solenoid into the other end as pictured.
• Plug the long white harness into the open connecter.
• Gently stuff the excess wiring and the two connectors into the space on the left side of the solenoid. Be careful not to damage the wires or the Luxe’s circuit board.
• Plug the RF Transmitter into the white harness.
• Test- Turn on your Luxe, turn the eyes off and pull the trigger. Each time you pull the trigger, a LED will flash if you are properly connected.
• Locate the RF Transmitter as pictured and put the grips back in place. If done correctly the grip should lay flat, just as before.
• Close up the grips. Check that they sit flush.
• Synchronize your gun with your loader as per the loader's manual.
1) Are you using sound, but haven't disabled the RF activation?
If so the loader may be getting stray signals from someone elses RF transmitter and appear to be jamming even when it isn't. This is commonly the answer when you can "clear" the jam simply by pushing the motor advanced button, and the jamming goes away completely after pushing the button three times... Check this post for how to fix it.
2) Are you batteries good? Use some replacement brand name batteries, and make sure they are new.
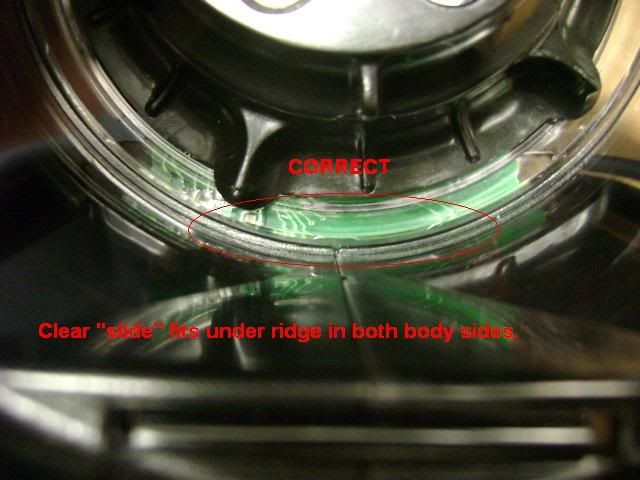
3) Is the loader jamming but you can't see where? Often it's because the body shells aren't together properly at the back vertical wall. Run your finger inside along the back wall to check the shells are fitting together like below. The shells should align flush as can be seen at the 'b' of both in the red wording on the image.
If they aren't and you can feel that one part of the body is sticking in, it's a simple fix. Remove the front of the body. Remove the back plate. Open the lid. Gently pull the shells apart at the rear and align them. Close the lid. Replace the back plate. Replace the front body.
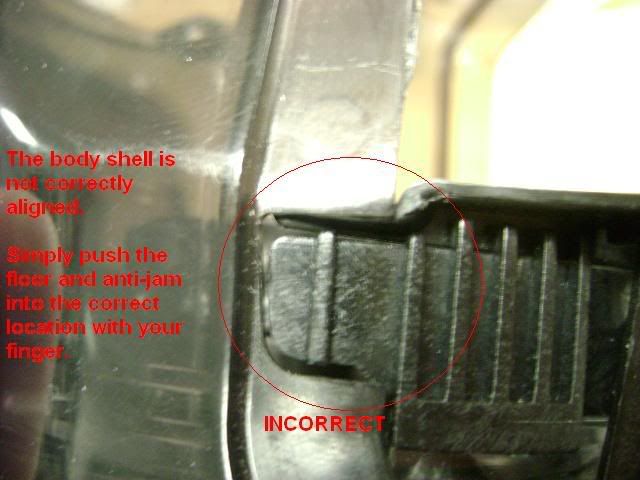
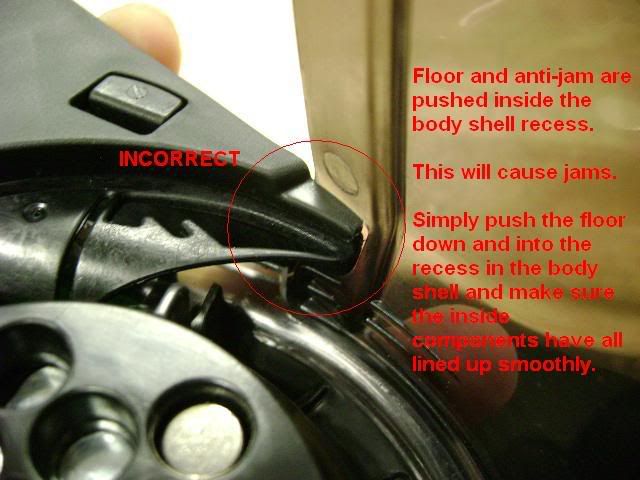
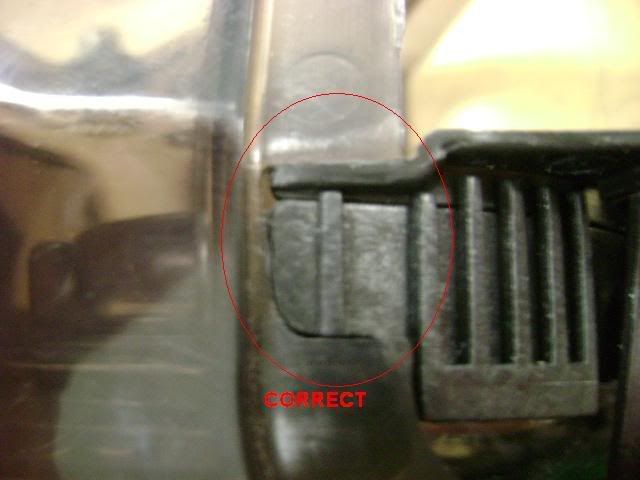
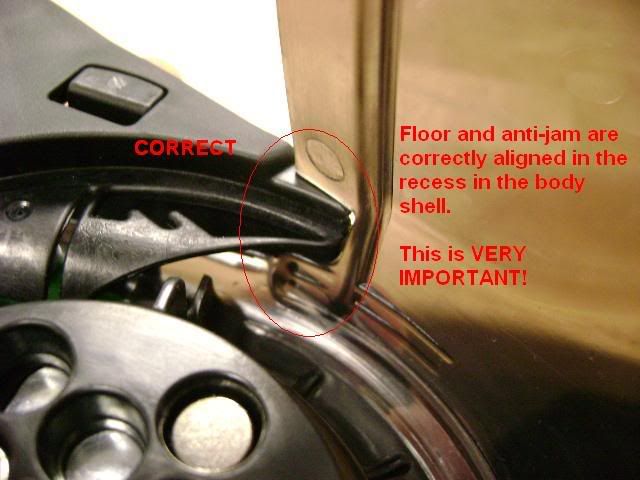
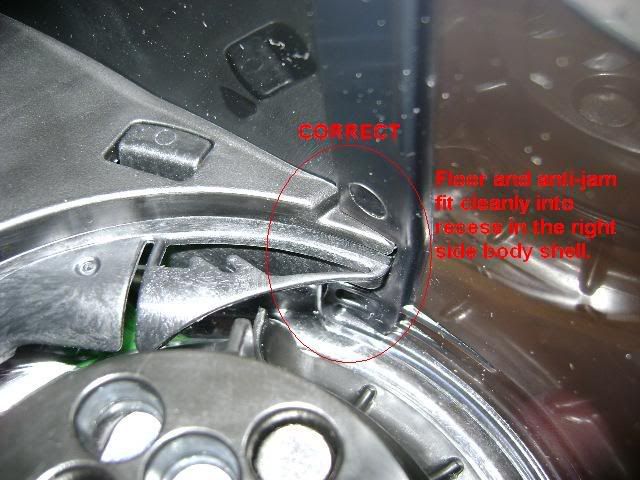
4) Balls are jamming at the outlet. This is usually because the body shell on the right side is not correctly aligned with the outlet and anti-jam. It's either allowing the anti-jam to lift, of the anti-jam is pushed inside the body shell and actually stopping the balls from feeding.
It shouldn't look like this...
It should look like this...
5) Does it appear to be "jamming" simply because the clutch is slipping too easily?
This is usually caused by the drive extension (the piece with the magnets in it) not sitting down on the metal plate properly. This may be because it isn't aligned on the shaft properly. In which case it can be fixed by holding it with one hand while turning the rip drive wheel with the other until you hear and feel it "snap" down into place.
Another common cause of this is debris between the magnets and the metal plate. Take the extension off and make sure there is nothing attached to the magnets that would hold them away from the metal plate.
Another possible cause is that the 'E' clip above the metal place that keeps the drive system together isn't installed correctly in the groove and it is sitting out and stopping the drive extension from fitting down properly. Simply fix this by pushing the 'E' clip further onto the shaft. The 'E' clip should look to be concentric with the shaft, that is to say the shaft should look to be right in the middle of the circle formed by the outside of the 'E' clip.
Quote:
Originally Posted by ktizzle
Off the top I love the Prophecy for a lot of reasons that I'm not going to waste readers times with, but it seems as though a lot of people have been having assembly issues with this hopper and I've personally come across one that I haven't seen posted about yet. This issue might be affecting other people and they just don't know it yet.
The Scenario:
I used the hopper out the box and it worked great. I take it apart making sure that all the grooves are lined up like the pix and the videos, so that if there's ever an issue I have the practice at home getting it back together right so that when I am at the field I know how to do it.
The Issue:
second time I go to use the hopper, happens to be after the first time I've taken it apart. Fill the hopper go to shoot it, I get a couple balls out and then nothing. I have an RF chip and it's sinked correctly, but when I pull the trigger the cone just seems to twitch a little bit. first thing I do is check the batteries. I put a fresh set in even though I've only used it one other day with fresh batteries in that day. I go to shoot and same thing. I spin the rip drive and it seems to help a little. I can shoot a couple more then it stops again.
If the hoppers empty the drive spins fine when I pull the trigger, but as soon as I put paint in it seems to just get stuck. I continue trying to use the rip drive and it'll work some and stop again, all while I'm doing this I'm having issues with broken paint. You'll find out later why.
I take the hopper shell off and reassemble it hoping this will fix it, thinking I must have somehow put it together wrong when I was at home. Still nothing!!!
Cause:
when I got home I started doing some process of elimination things with paint into a paint caddy and using my RF to activate the hopper. so I could see why or how it was getting stopping and just twitching and this is what I found.
the first time I pulled the hopper apart and put it back together what I didn't realize that when I put everything back together I managed to push in tray some right next to the motor housing where my arrow is pointing to.
the picture below shows the issue
the small tab on the tray was stuck out like that and balls were getting caught on it and jamming the motor. sometimes they would make it past, depending on how full the hopper was. If I filled the hopper all the way up it was guaranteed to get stuck. everything else was lined up right and all I had to do was make sure that this tab sat back like it was supposed to and the hopper has worked flawless since.
the other thing that was happening is that when I'd use the rip drive to get the hopper to turn again. I would sometimes tear a ball open getting it past this tab. I'm sure you can imagine the results.
None the less I hope this post helps somebody out cause I could have used it earlier... LOL
Empire RF Transmitter Installation in a TM-7 Marker.
• Make sure your marker is degassed and safe to work on.
• Apply tape onto the Empire RF transmitter as pictured. Try to leave the two LEDs uncovered.
• Separate the body shells per the markers manual.
• Disconnect the solenoid from the stock wiring harness.
• Attach the correct included harness (one pictured) into the TM-7 solenoid plug and then plug the solenoid into the other end as pictured.
• Plug the long white harness into the open connecter and then plug the RF transmitter into the white harness.
• Install the RF transmitter in the provided space on the right side shell as pictured and gently bend the antenna; so it’s pointing toward the loader. If the electrical tape does not hold the RF transmitter in place, use some double sided tape.
• Make sure all the wiring is contained within the shell, so nothing gets caught between the shells.
• Re-assemble marker following the markers instructions.
• Synchronize your gun with your loader as per the loader's manual.
• Test - Turn on your TM-7 with the eyes off and pull the trigger. Each time you pull the trigger, the loader will spin.
Empire RF Transmitter Installation in an Invert Mini Marker
• Make sure your marker is degassed and safe to work on.
• Apply tape onto the Empire RF transmitter as pictured. Try to leave the two LEDs uncovered, so you can check that it’s receiving a signal once connected.
• Remove the front foregrip by loosening the two set screw and sliding the foregrip down and off the marker.
• Remove the two grip screws on the left side and bend the grips behind the trigger guard, so they are out of the way.
• Using a 1/8” Allen wrench, remove the two screws which hold the frame to the body and carefully lower the frame away from the body.
• Disconnect the solenoid from the sensor board.
• Attach the correct included harness (one pictured) into the Mini’s solenoid plug on the sensor board and then plug the solenoid into the other end as pictured.
• Plug the long white harness into the open connecter.
• With the white harness pointed downward, slide the frame back up to the body. While sliding the frame back on, make sure the harness does not get caught on anything.
• Plug the RF transmitter into the white harness.
• Slide the foregrip back on and tighten the two set screws.
• Test- Turn on your Mini with the eyes off and pull the trigger. Each time you pull the trigger, a LED will flash if you are properly connected.
• Put the grips back in place and re-install the two grip screws.
• Synchronize your gun with your loader as per the loader's manual.
A small number of customers who are using late-edition (recently manufactured) RF equipped Magna-Drive loaders with their Ego9s may be experiencing difficulty in getting the Ego9 to detect the RF transmitter. This issue is a result of small timing variations between the transmitter and the Ego9 and is easily resolved with an upgrade to the Ego9 firmware. This firmware is currently undergoing extensive field testing and we anticipate that it will be available through our network of Eclipse Service Centers from the end of January 2009. As always, it will also be possible to upgrade at any national event at which there is Planet Eclipse technical support.
Customers who are using late-edition (recently manufactured) Magna RF Transmitters with their Ego9s should NOT connect the transmitter to the solenoid connector on the Ego9 board. Doing so may cause the board to shut down when the gun is fired due to the excessive power requirement of the transmitter. RF transmitters should ONLY be connected to the AUX connector which has been specifically included on the board for this purpose.
Customers may also be experiencing difficulty in getting the Ego9 to detect a late-edition Magna RF Transmitter when the transmitter is connected to the AUX connector. This issue is a result of timing incompatibilities between the transmitter and the Ego9 and is easily resolved with an upgrade to the Ego9 firmware. This upgrade, version 1.20, is available from our Rhode Island (US) and Manchester (Europe) Service Centres or at any national event at which there is Planet Eclipse technical support.
Tremendous thanks to all the informational resources you've provided and your support. The Prophecy is truely an amazing loader and I'm very pleased with my decision to wait for the second shipment. In comparing with other solid loaders (e.g. Rotor) out there; I'm confident that I've made the right choice (and so are some of my Rotor owning friends).
You can simply add some. You can add the large spare magnets that came with the loader to the ones inside the body shell. I recommend a drop of superglue to help make sure they stay positively in place under all circumstances, but you can just put them in place to test it out.
You can also add them on top of the lid, I like the thinner magnets that came with the Magna clutch kit for this.
simple. go buy two 3AAA harnesses, and a 9v harness. connect them in series (red to black).
vid one
vid two
***I know i said 240 balls in the vid. i went back, did a similar fill, and then counted with 10 round tubes. About 200 balls were actually in the loader.
I do not have goldwave or any software of that sort, but looking at the vid, it took about 5 seconds to feed all the balls out. 200/5=40
I know drop tests do NOT fully show the performance of a hopper, but it shows the max speed a hopper can feed paintballs since there is no resistance from a moving bolt.
i make no claim with this post and videos. it is strictly info.
__________________
"Originally posted by loneassassin: The problem is, they keep making better idiots..."


 we've been looking to get our systems working together in Synergy for the best possible results.


 Your Privacy Choices