 |
|
 09-22-2011, 07:15 AM
|
#1
|
|
Join Date: Dec 2010
Location: Alabama
|
Pneumatic circuit for select-fire mechanical Ion
I believe i have come up with a method of making a smart parts ion into a mechanical select-fire marker. To my knowledge, this is an original design. Below is a rough diagram of the circuit. Any concerns/input?

QEV - quick exhaust valve
FCV - flow control valve
PRV - adjustable pressure relief valve
Last edited by chasethebarber : 09-22-2011 at 07:50 AM.
|

|

|
 Sponsored Links
|
Remove Advertisement
|
|
Advertisement
|
|
|
09-22-2011, 04:27 PM
|
#2
|
|
Join Date: Sep 2008
Location: Nashville, TN
|
hmm... Could you explain your diagram a bit? I am not sure I am looking at it just right. Are you wanting to switch between semi and full auto? I am assuming the PRV will have something to do with the firing (full auto). would this be used on the bolt portion to push it back and then release it?
|
|
|
|
|
09-22-2011, 10:18 PM
|
#3
|
|
Join Date: Dec 2010
Location: Alabama
|
Yeah, sorry i didn't elaborate at first. I posted this as I was leaving for work, so I didn't have time to add details. This circuit controls the flow of air to/from the front of the bolt, whereas the rear of the marker is unaffected. The purpose of this modification is to allow a mechanical full-auto option on the ion and other compatible markers(I came up with the idea when I was toying with the thought of building a pneumag).
The air is directed through a set of three autococker 3-ways, the first of which is operated by the trigger. Which barb the air flows through is determined by the position of the other two 3-ways(which are linked together by a threaded rod). When the linked 3-ways are in the forward position, the air flows just like in a normal ion, firing when the trigger pull shuts off the air flow.
However, when they are in the rearward position, the air begins to flow when the trigger is pulled. As the bolt cocks, the air is allowed to flow past the flow control valve and into the pressure relief valve. Once the pre-determined pressure is reached, the relief valve will begin to vent the pressure. Hopefully, this pressure drop will be enough to cause the qev to vent the air and fire the marker. Once the marker has fired, the cycle should begin again automatically. Cycle rate is controlled by the flow control valve.
Since I have not yet tested it, I do not know whether or not it will actually work as I hope. I am trying to get outside opinions while i gather the parts. Any problems you might foresee?
Last edited by chasethebarber : 09-23-2011 at 08:48 AM.
|
|
|
|
|
09-23-2011, 07:34 AM
|
#4
|
|
Join Date: Sep 2008
Location: Nashville, TN
|
Ok, i see what you are saying. So are you going to have 2 3 ways side by side connected to the trigger? And where is the other one going?
The only problem I see is like you mentioned, the venting of the flow control valve. I havent had a whole lot of experience with them, but i think when they vent its a very small *puff* of air. This might give you problems if the puff of air isnt big enough to get the bolt completely forward before it starts to recharge again.
Only other thing would be space required for all of this. Very good concept though, its pretty intriguing. You might have to make a try or something to house everything, but heck, a select fire ion could get past a tray lol.
|
|
|
|
|
09-23-2011, 08:44 AM
|
#5
|
|
Join Date: Dec 2010
Location: Alabama
|
One of the 3-ways will be operated by the trigger, the other two will be operated by whatever switch/lever i decide to use as the selector.
As for space, this isn't going to be on a normal ion frame. I knew it wouldn't fit inside the grip, so it will be more like a bullpup rifle than your typical ion. Only the trigger 3-way will be inside the grip.
In fact, the only SP parts I plan on using so far are detents and the trigger frame. Everything else is warrior, shocktech, or evil. When I am finished, it will probably look more like an automag had a child with a tiberius.
Last edited by chasethebarber : 09-23-2011 at 08:56 AM.
|
|
|
|
|
09-23-2011, 09:05 AM
|
#6
|
|
Join Date: Sep 2008
Location: Nashville, TN
|
Ah, I see. Very interesting concept.
So what are you planning on using for the body/bolt/firing chamber, etc.? Ion parts, or other custom creations?
|
|
|
|
|
09-23-2011, 12:24 PM
|
#7
|
|
Join Date: Dec 2010
Location: Alabama
|
The breech/firing chamber are Warrior, the bolt is a Shocktech Superfly. Turns out i am also going to have to hunt down a bolt stop...I wish i had realized it was separate from the firing chamber earlier. all parts are designed to be used on an Ion. I wish I had the equipment to make my own, but unfortunately I don't.
|
|
|
|
|
09-24-2011, 12:20 PM
|
#8
|
|
SBPB
Join Date: Jan 2008
Location: Milwaukee
|
so wait...could i do this to my pneumag?
|
|
|
|
|
09-24-2011, 06:01 PM
|
#9
|
|
Join Date: Dec 2010
Location: Alabama
|
Assuming it works, I don't see why not. I originally was going to use this to build a pneumag, but decided to go with an ion because I already love my mag how it is. I'll post a diagram on how to do so after I get off work.
Last edited by chasethebarber : 09-24-2011 at 06:39 PM.
|
|
|
|
|
09-24-2011, 07:10 PM
|
#10
|
|
SBPB
Join Date: Jan 2008
Location: Milwaukee
|
Diagram would be Awsome cuz I don't know how much room I have in my frame
|
|
|
|
|
09-24-2011, 09:14 PM
|
#11
|
|
Join Date: Dec 2010
Location: Alabama
|
I don't think you'll be able to get everything in the frame, especially if you try to put the lpr in there with it.
|
|
|
|
|
09-24-2011, 10:44 PM
|
#12
|
|
We are... Penn State!
Join Date: Nov 2006
Location: Kentucky
|
Quote:
Originally Posted by chasethebarber

The breech/firing chamber are Warrior, the bolt is a Shocktech Superfly. Turns out i am also going to have to hunt down a bolt stop...I wish i had realized it was separate from the firing chamber earlier. all parts are designed to be used on an Ion. I wish I had the equipment to make my own, but unfortunately I don't.
|
Need a bolt stop? PM me, Ill send you one.
__________________
Penn State Tennis
|
|
|
|
|
09-26-2011, 03:19 PM
|
#13
|
|
SBPB
Join Date: Jan 2008
Location: Milwaukee
|
my mag is not a sleeper so there is some room but not much where does the prv hook up???
 |
|
|
|
|
09-26-2011, 04:14 PM
|
#14
|
|
Join Date: Dec 2010
Location: Alabama
|
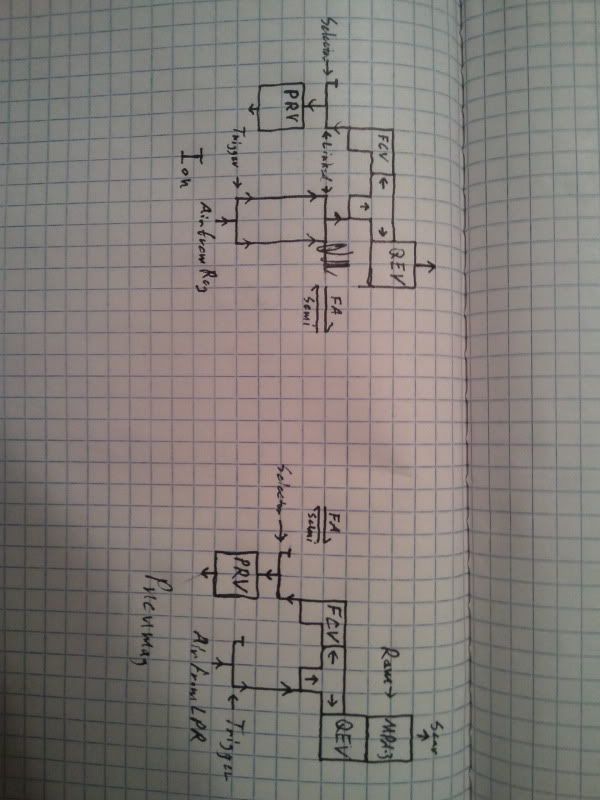
Here is the circuit that should be used on a Pneumag. I apologize for the delay.
You will need a QEV, a tee, flow control valve(unless you want uncontrolled cycling), and a pressure relief valve of some kind. This diagram shows the order in which they should be connected, but you should able to alter the exact layout as long as the order remains the same.
I still have not been able to test this, so it might not work the way i hope it will. If you attempt this before I do, please share your results. In the event that it doesn't work as expected, I'll try to help.

The air should flow through your QEV, through the tee to your sear actuator(I assume you used an MPA-3) and flow control valve, then end up at your pressure relief valve. You must have a QEV or else the pressure might not drop enough to allow for another cycle.
Please excuse my horrible hand writing.
__________________
Normal? What's that?
Last edited by chasethebarber : 09-26-2011 at 04:18 PM.
|
|
|
|
|
09-26-2011, 05:56 PM
|
#15
|
|
SBPB
Join Date: Jan 2008
Location: Milwaukee
|
doesnt the lpr serve the same purpose as the qev or is it different? and where does the ram connect
|
|
|
|
|
09-26-2011, 06:45 PM
|
#16
|
|
Two Fat Guys
Join Date: Mar 2005
Location: Plattsburgh, NY
|
Getting close, but there are a few little things that you'll need to take care of. I think it could work, but it would be a very temperamental system.
QEV/PRV - you need to bleed pressure on the upstream side of the QEV for it to vent, not the discharge side.
|
|
|
|
|
09-26-2011, 07:25 PM
|
#17
|
|
Join Date: Dec 2010
Location: Alabama
|
In that case, you should be able to put the tee before the QEV and branch from there, correct? This is the first time I've played around with pneumatics(aside from adjusting the timing on my '98 Cocker), so this oversight doesn't surprise me. And I am not too worried about it being temperamental...just wanted to see if I could do it.
inmylife2415,
the QEV allows the air to bleed away from the ram faster, increasing your cycle rate. It opens when there is a ~10% drop in air pressure. Without the QEV, the PRV probably won't bleed off enough pressure to allow the marker to cycle again. Think of the QEV as a pilot-controlled dump valve in this case, with the PRV acting as the pilot.
EDIT: here is an updated pair of diagrams, as per Yoda's suggestion.
__________________
Normal? What's that?
Last edited by chasethebarber : 09-26-2011 at 09:59 PM.
Reason: Forgot an "r" in there...feel free to guess where.
|
|
|
|
|
09-27-2011, 02:05 PM
|
#18
|
|
SBPB
Join Date: Jan 2008
Location: Milwaukee
|
This would work with a mech cocker as well correct... My brother has been asking me to pneu his cocker and my mag shoots to amazing for me to touch right meow. So ide like to try this from scratch on a cocker..if that would change any designs on the pneumatics please lmk cuz I plan on ordering all parts this weekend and getting this thing started
|
|
|
|
|
09-27-2011, 02:51 PM
|
#19
|
|
Join Date: Dec 2010
Location: Alabama
|
Are you wanting to make the Autococker full auto or just put a pneumatic trigger on it? They are very different modifications and require more parts than an Ion or Pneumag would...mainly due to the complexity of operation.
__________________
Normal? What's that?
|
|
|
|
|
09-27-2011, 04:34 PM
|
#20
|
|
SBPB
Join Date: Jan 2008
Location: Milwaukee
|
I would like to make the cocker select-fire because im putting a pneumatic tirgger on it anyway...but if thats not possiable I would be willing to do it to my mag just to fulfill our curiousity......but damn I just got her shooting ( .)(. )ies
|
|
|
|
|
09-27-2011, 06:38 PM
|
#21
|
|
Join Date: Dec 2010
Location: Alabama
|
I believe that it could be done, but it would make an already complex marker even more so. The main issue is getting the sear and 3-way to move at the correct times in a consistent manner. On a cocker, I would stick with semi only.
__________________
Normal? What's that?
|
|
|
|
 Posting Rules
|
You may not post new threads
You may not post replies
You may not post attachments
You may not edit your posts
HTML code is Off
|
|
|
|


 Your Privacy Choices