 |
|
 10-13-2007, 10:00 PM
|
#1
|
|
2nd account- 05'er
Join Date: Oct 2007
Location: NorJers*
|
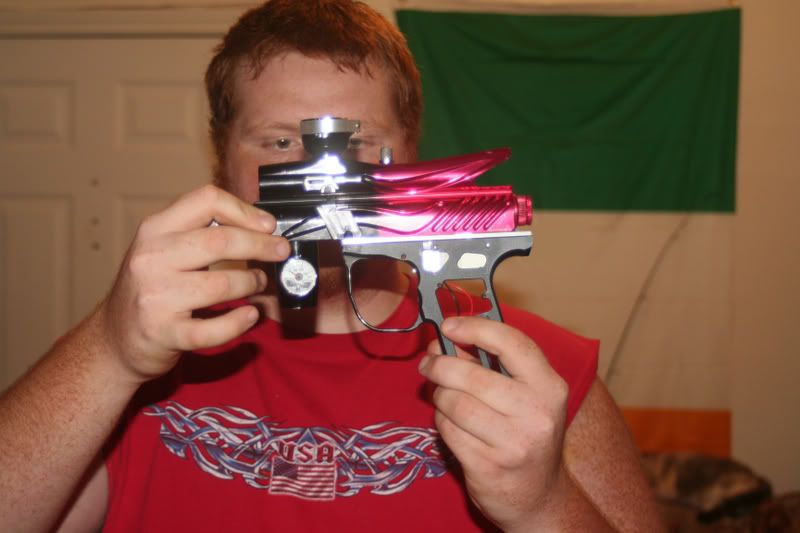
Impulse+Ego= Imgo *Pics*Vids*Trayless*SL66*Etek*
Imgo and trayless tutorials with pics!
This will be updated as I go, and the last date I updated was:
*updated April 36 2009*
Im sorry about the pics. Putfile apparently doesnt exist anymore. I have re uploaded them to photobucket and labeled as many as I could to match up with the steps. The pics can be found here:
http://s130.photobucket.com/albums/p...ntballer/Imgo/
~$~$~$~$~$~$~$~$~$~$~$~$~$~$~$~$~$~$
This gun is up for sale, since its off to college for me. Ive done alot of the heavy lifting, but theres still some things to be done. Those willing to answer the call need to be able to solder the eye wires better, and make a hole for the eye button on the back of the ego frame. It will need to be tuned as well since the reg is new and is still bottemed out. I havent had air since Atlas closed in North Jersey. :-(
-View my thread for info
https://www.pbnation.com/showthread.p...6#post58395576
~$~$~$~$~$~$~$~$~$~$~$~$~$~$~$~$~$~$
And the video directly below still works:
Paint: http://s130.photobucket.com/albums/p...ent=Imgo-1.flv
_____________________________
Things ive accomplished so far/specs: - Trayless
- Impulse body and internals (shocktech bolt, function ram etc)
- 1/50? blue/clear Ego frame,
- Etek lucky board and Codex chip,
- 06 ego solenoid
- L.E. SL66 Ice Cuba trigger!!!!!
- Can easily be reversed to a normal impulse (only thing modified was the frame)
- Actually shooting functional was always a plus
 - CP reg and on/off
SOON TO COME:
vid is in semi
https://www.pbnation.com/videos/view/63/
Imgo basic tutorial:
***I wont take responsibility for you screwing something up if you try this***
I bet no one could have guessed how simple this is... only 1 hole to drill
Supplies list:
-Tools-
Allen wrenches
Screw drivers *tiny ones also for the solenoid and impulse board*
Hack saw/ something to cut screws
Power drill
Files
-Impulse- - Body
- Internals
- Tray (havent gone trayless yet)
- Reg+ reg mount
-Ego- - Frame+trig+grips
- Board
- Solenoid
-Misc- - Screws to hold in the frame. You will need longer ones with the same threads to cut down.
- Take off your reg and your frame/tray
- Take out the solenoid plug from the board and off of the battery. You can put the impulse frame somewhere else because we wont need it.
- Unscrew the 2 screws holding the solenoid into the gun *DO NOT LOSE THE SCREWS OR THE SOLENOID GASKET*
- Now if you look at your 2 solenoids, you notice the holes are the same, even the screw holes! You simply swap the impulse and ego solenoids.
- Take the impulse solenoid screws and put them in. They will most likely be too long. Measure the space, take them out, and file them down to size slowly. Screw them in every once and awhile to make sure they arent too short or too long.
- Now take your tray and unscrew the 2 tiny screws holding the board into the tray and take out the board.
- Have your ego frame ready. take the tray and put it over the frame. line up the front hole by putting a screw from the top to the bottem
- Center it, and take a marker/something to scratch a mark where the new hole for the back screw is going to be through the top.
- Take off the tray and you will see the mark isnt in the center. Dont worry, its supposed to be
- Get a drill and make your hole tiny, and work out from there until the screw fits.
- For a cleaner look, take a bit 1-2 sizes bigger then your final hole size, and on the other side of the frame, deburr the hole a little bit.
- Take your frame and tray and line them up on the gun. Use the longer screws with the same threads as the orignals for the frame you got and screw them into the gun.
- Once they're all the way in, measure how much extra space there is and take them out. Now measure from the bottem the same length and cut it with a hack saw and then file them for a clean bottem.
Mine are approx 1 1/2 inchs for the back frame screw and 1 1/4 inches long for the front screw.
- Put the solenoid wire through the large circle in the tray, and then into the frame, and plug into the board
- Screw in your custom frame screws, and put on your reg, macroline, grip screws etc.
- PM me about how sweet it is
If you think im missing a step please tell me so i can fix it. I dont want to leave you hanging in the middle of it.
Trayless Mod Tutorial:
I dont take repsonsibility for you messing this up. Skill with your tools is required.
I also recommend that you read and look through the pictures before even thinking about trying this.
My dimensions may not be the same as yours depending on how you did this. You will need to be able to do a little fitting work on your part as well.
Tools
Dremel+cutting wheel+drill bit/Drill
Files
Tin snips like these http://zenstoves.net/Supplies/TinSnips.jpg
Vice (padded or get a towel so it doesnt scratch)
Pliers
Supplies
Pretty thin sheet metal
Custom screws from 1st tutorial
Long grip screw at least an inch long
- Take off the grips/frame/tray. Take out the batter/board etc. Put the tray somewhere else because were making this trayless!
- Take the frame and put it in the vice. Now its time for the first cut. The solenoid is offset to the left, so on the left side of the frame, you will see the top 2 holes that used to hold the grip screws. Those are going to go. Use your dremel with the cutting wheel and cut the piece going vertical to the hole on the left, and then cut the piece that connects to the right hole. You should end up with this.
- Next, measure 4.3 cm away from the back of the snatch grip and make a mark. (on 05 ego frame) On any other frame you will have to line up the frame and solenoid yourself and make a mark.
- Now cut down the left "wall" at that mark and then cut across its bottem and take out the piece. You will have approx .1-.2cm of extra material on the remaining wall to the right of the cut you just made. (in the first step pic you can see I had allready started cutting down the wall) You will have to file down until the solenoid fits onto that.
- Once the solenoid fits in front of that wall, you will start to cut into the frame. Take your dremel+drill bit or real drill and start to cut away at the metal in about .7-.8 from the outer wall. In total, it will be about 1.2-1.3cm deep as well into the frame. Keep putting the body on the frame to make sure your cutting enough for the solenoid to fit. You should make it look like this, but a little bit deeper into the bottem.
- Once your body fits flush all the way on, take your screws and put them all the way in. Measure how much extra space there is, take them out, and hacksaw it off. Then file until the bottem is clean.
- Now put it all together. Look good? Good. Now its time to cover up that solenoid. Get a piece of paper and your piece of sheet metal. on the paper, draw with a ruler the dimensions in this picture. Then trace it to the metal sheet and cut it with the tin cutters. *yours may not be exactly the same. you will have to fit alot by yourself here*
This picture also shows the approximate bends you will have to make. Fit it to your frame.
- Get your grips and cut down about 1.2cm, and in until it is about .2-.3cm thick.
- Line up your grips on the gun, and put in the screw on the bottem. Take a pencil, and mark where the top left grip hole is. Then take it out, drill it, and put in your longer grip screw that will screw into the hole directly across from it on the other side of the frame. Cut it down and file if necessary.
- Put it all together, if it doesnt fit, keep cutting! If it does fit, CONGRATS! You have a trayless Imgo the NHB way
TRAYLESS
Update Feb 11th: Lucky board, codex, SL66 trig. (BB eye hole is drilled but I dont have a pic yet)
Last edited by NHBPaintball : 07-14-2009 at 09:41 PM.
|

|

|
 Sponsored Links
|
Remove Advertisement
|
|
Advertisement
|
|
|
10-13-2007, 10:05 PM
|
#2
|
|
Join Date: Jun 2006
Location: STL
|
sweet
|
|
|
|
|
10-13-2007, 10:05 PM
|
#3
|
|
Wroooaaarrrr!
|
Wow.
That looks really funky, funkier than the DMpulse.
|
|
|
|
|
10-13-2007, 10:20 PM
|
#4
|
|
2nd account- 05'er
Join Date: Oct 2007
Location: NorJers*
|
yea the reason is definatly the colors. but i got the entire frame setup for cheap so idc. once i got passed that i think it looked semi decent. wont be using it in a tourney anytime soon but i might use it in some screw around games
*edit* just noticed you said funkier then the DMpulse, but you have it in your sig. maybe thats why you think mines funkier 
Last edited by NHBPaintball : 10-13-2007 at 10:35 PM.
|
|
|
|
|
10-13-2007, 10:25 PM
|
#5
|
|
Ego♥
|
Ugly as sin
__________________
Ego Mafia
|
|
|
|
|
10-13-2007, 10:28 PM
|
#6
|
|
2nd account- 05'er
Join Date: Oct 2007
Location: NorJers*
|
ouch... wasnt aiming for looks but to each his own.
Last edited by NHBPaintball : 10-13-2007 at 10:35 PM.
|
|
|
|
|
10-13-2007, 10:32 PM
|
#7
|
|
Playing it Bogart
|
Maybe take some more time and clean up how the frame blends in with the marker..
its ugly at the moment.
|
|
|
|
|
10-13-2007, 10:38 PM
|
#8
|
|
The EM1 Collector
Join Date: Jan 2006
Location: Manhattan, NY
|
Just cut off the end of the frame to line it up with the body, and get it anno'd black. Otherwise nice job.
|
|
|
|
|
10-13-2007, 10:39 PM
|
#9
|
|
2nd account- 05'er
Join Date: Oct 2007
Location: NorJers*
|
im a little too cheap to be worried about color, and the prob with taking off the snatch grip is that its "hollow" so there would be a giant hole that paint and dirt and **** could get in. Believe me ive thought it all out and ive basically come to just leaving it alone as a project gun and nothing more
*edit* if you cover the snatch with your finger on the first pic it looks even more like a weird tall brick.
*double edit* i may do the trayless mod someday which i think would make it look sicker but who knows...
Last edited by NHBPaintball : 10-13-2007 at 10:56 PM.
|
|
|
|
|
10-14-2007, 08:57 AM
|
#10
|
|
Join Date: Jul 2001
Location: East Coast
|
Quote:
Originally Posted by NHBPaintball

im a little too cheap to be worried about color, and the prob with taking off the snatch grip is that its "hollow" so there would be a giant hole that paint and dirt and **** could get in. Believe me ive thought it all out and ive basically come to just leaving it alone as a project gun and nothing more
*edit* if you cover the snatch with your finger on the first pic it looks even more like a weird tall brick.
*double edit* i may do the trayless mod someday which i think would make it look sicker but who knows...
|
It would look sick. My brother and I started a project just like this awhile back and it was gonna be trayless. The concept for the trayless mod is pretty simple, but you'd have to talk to him about he. He was the brains of the operation. His name is cakewalkpyro on here, so if you wanna shoot him a pm, Im sure he'd be willing to help. |
|
|
|
|
10-14-2007, 10:20 AM
|
#11
|
|
2nd account- 05'er
Join Date: Oct 2007
Location: NorJers*
|
i know him from the photoshop forum! |
|
|
|
|
10-14-2007, 10:30 AM
|
#12
|
|
Mandated fun
Join Date: Oct 2005
Location: Indiana
|
any other way to make it more sweet?
make it trayless 
 |
|
|
|
|
10-14-2007, 10:47 AM
|
#13
|
|
i dont even paintball
Join Date: Jan 2006
Location: Germany in 5 years
|
mill that stock body, make it trayless, and paint it.
sickest impulse evar?
you betcha.
|
|
|
|
|
10-14-2007, 12:16 PM
|
#14
|
Join Date: Nov 2006
Location: Kingston, Ontario
|
Yeah, make it trayless, turn it from a huge brick, into something sexy, like the Python Imp.
Put eyes in it, PLEASE, break beam would be sick as hell.
|
|
|
|
|
10-14-2007, 01:03 PM
|
#15
|
|
Join Date: Dec 2006
Location: Charleston, SC
|
Quote:
Originally Posted by NHBPaintball
im a little too cheap to be worried about color, and the prob with taking off the snatch grip is that its "hollow" so there would be a giant hole that paint and dirt and **** could get in. Believe me ive thought it all out and ive basically come to just leaving it alone as a project gun and nothing more
*edit* if you cover the snatch with your finger on the first pic it looks even more like a weird tall brick.
*double edit* i may do the trayless mod someday which i think would make it look sicker but who knows...
|
Besides, if he really wanted it black, he could just do it in photoshop. XD
Ugly, but hey, better than the gun I'm shooting right now, considering I have no internals in my gun. lol
__________________
CFOA Referee 2012 -
PSP Referee 2013 - 2015
MiLP Referee 2014 -
NXL Referee 2015 -2015
NCPA Nationals 2015-
|
|
|
|
|
10-14-2007, 01:12 PM
|
#16
|
|
2nd account- 05'er
Join Date: Oct 2007
Location: NorJers*
|
Quote:
Originally Posted by lp7159
mill that stock body, make it trayless, and paint it.
sickest impulse evar?
you betcha.
|
Quote:
Originally Posted by SuxXarD
Yeah, make it trayless, turn it from a huge brick, into something sexy, like the Python Imp.
Put eyes in it, PLEASE, break beam would be sick as hell.
|
ok since the people who say its ugly have offered constructive criticism i guess im gonna try taking some weight off (by means of dremel, files, sandpaper, and time prob), ill look into some way to make it trayless, and maybe even eyes....
im gonna have some questions though for you guys cuz im gonna need some ideas like how to run the eye wires. the way i originally thought, the eyes were too short to make it to the breech. (i just took the eyes out of my ego6 and plugged um in to see how long they were)
*edit* if i make it trayless, the eyes might be long enough.... and i think id be set.... so then i need somebody to PM me with some trayless ideas
-thanks guys!
Last edited by NHBPaintball : 10-14-2007 at 01:16 PM.
|
|
|
|
|
10-14-2007, 01:37 PM
|
#17
|
|
2nd account- 05'er
Join Date: Oct 2007
Location: NorJers*
|
o yea and 1 more thing. if anyone has any skills in photoshop/paint and some serious ideas for milling, feel free to post some pics!
i was thinking maybe something like the 06 ego milling. have some kinda of pretty simple "hook" type design maybe?
keep in mind my access to tools though:
drill press, dremel, files, sandpaper, etc. i have mostly standard work tools. no $5,000,000 milling machines in the basement haha
Last edited by NHBPaintball : 10-14-2007 at 01:41 PM.
|
|
|
|
|
10-14-2007, 01:48 PM
|
#18
|
|
Ninja A1
Join Date: Feb 2006
Location: Waverly, NY
|
Yeah I started this project a long time ago but gave it up because of funding reasons. I had a couple of Ideas for going trayless so if you interested PM me and we can talk.
__________________
ECarmy
|
|
|
|
|
10-14-2007, 01:58 PM
|
#19
|
|
Free techs+repairs PM me!
Join Date: Aug 2006
Location: Dupont, Washington
|
i love you.
|
|
|
|
|
10-14-2007, 02:29 PM
|
#20
|
|
yeaa
Join Date: Dec 2005
Location: ICT, KS
|
nice. ya trayless looks alot better, get it painted and milled and that would turn heads. good job
__________________
Feedback
"Catch your favorite close line and learn to dry yourself up."
|
|
|
|
|
10-14-2007, 02:44 PM
|
#21
|
|
Its Chuck
Join Date: Apr 2007
Location: *502*
|
never seen a trayless imp...
__________________
im old round these parts
i also enjoy pickles
|
|
|
|
 Posting Rules
|
You may not post new threads
You may not post replies
You may not post attachments
You may not edit your posts
HTML code is Off
|
|
|
|


 Your Privacy Choices