 |
|
 07-21-2008, 07:25 PM
|
#1
|
|
www.anodizeworld.com
Join Date: Dec 2007
Location: Michigan
|
A1 Complete Disassembly Instructions
After I made the G7 Disassembly Videos, I got the request for A1 instructions. I will start with a photo documentation and if people need it, I will do a video tutorial.
Comming Soon.......  Gun Before Work:
 TOOLS:
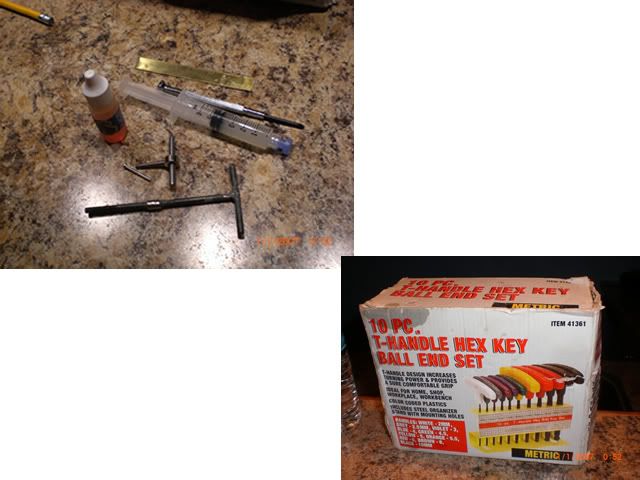
Do NOT do this unless you have all necessary tools.
You will need the following:
1. A set of METRIC T-Wrenches. Sizes 1mm, 2mm, 2.5mm, 3mm, and 4mm.
2. SMALL Phillips Head Screwdriver
3. Tools that came with your A1. These are important, I do not have the Angel tools, so I made my own. They are basically threaded Allen Wrenches. I made mine from stainless machine screws and welded them to rods. Sizes are 2mm 3mm and 4mm metric threads. If you do not have the tools from Angel, or the skills needed to competently make your own tools STOP HERE. This is for your own good.
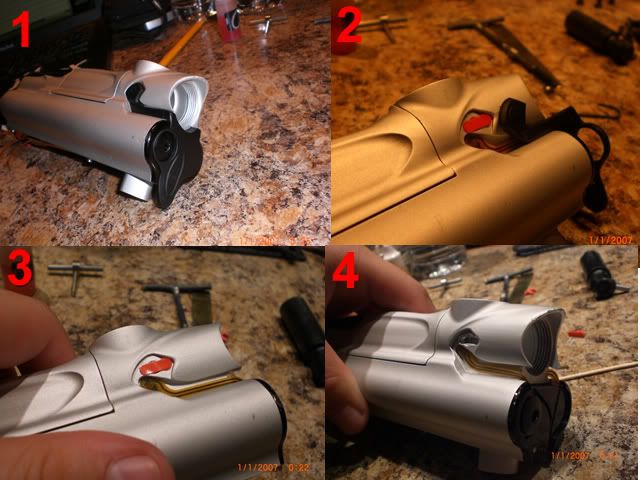
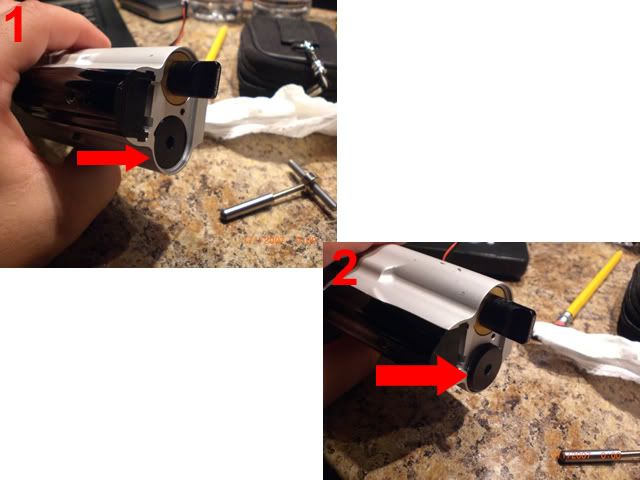
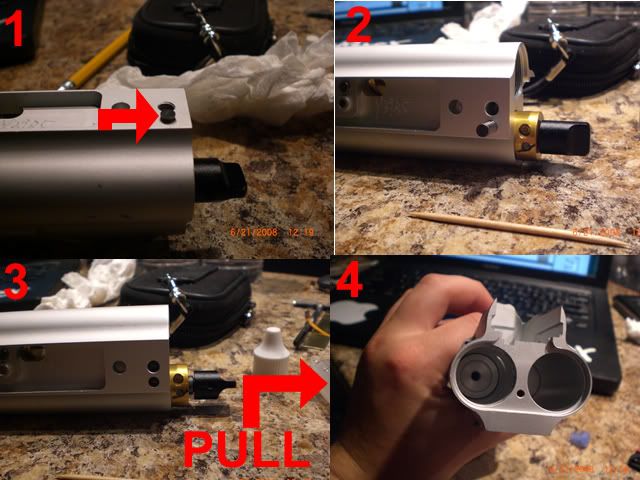
Step 1 - ASA Removal
There are 2 screws which attach the ASA to the rail on the bottom of the trigger frame. The front screw in labeled in the photo by the arrow, and the other is in the rear directly behind the ASA in the same place. Once the screws are removed, the ASA will slide right off the rail. Make sure the macro-line hose has been disconnected before doing this. Once the ASA is off, you can unscrew the cap from the ASA unit so it is now 2 pieces.
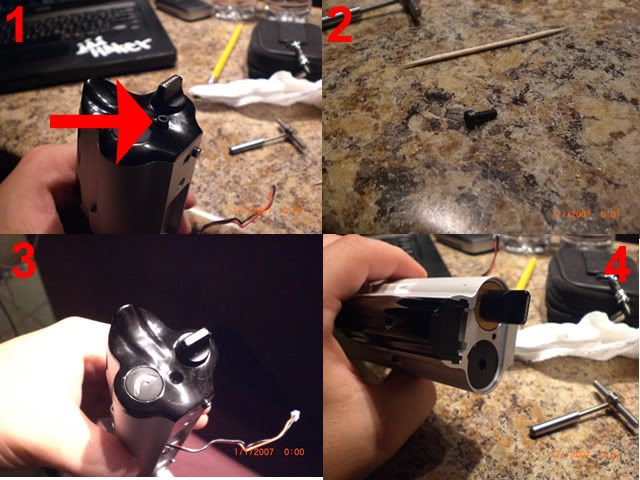
Trigger Frame Removal
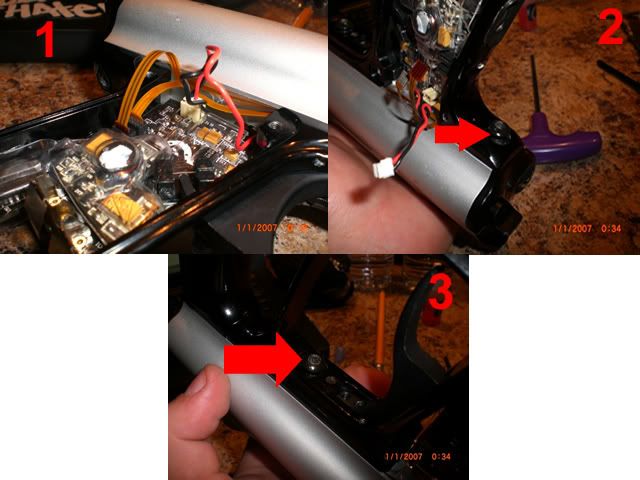
The Trigger Frame is held on with 2 screws (3mm) the locations of the screws are indicated with arrows. Before you remove the screws, remove all wires that are connected to the board. I did not include instructions on how to remove the grips, because if you cant do that, you really should not go any farther. The grips are held on with 6 2mm screws.
Once the 2 main frame screws are removed and wires have been detached, the frame will just pull away.
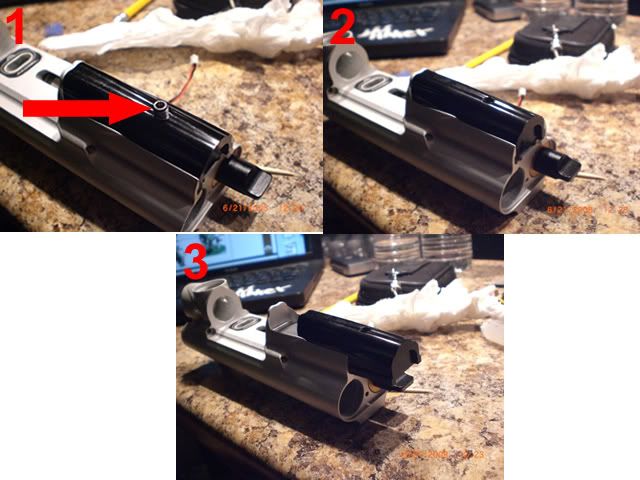
Trigger Removal
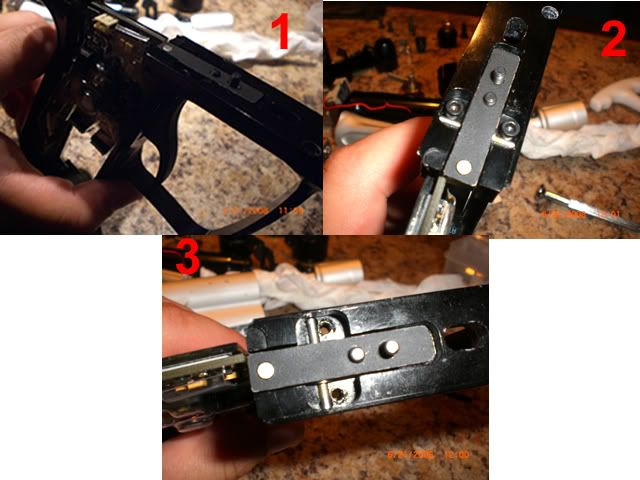
This is simple. Look at the top of the frame, you will see 2 screws on either side of the trigger. These are 2mm screws, once you remove them, the trigger will lift up right out of the frame.
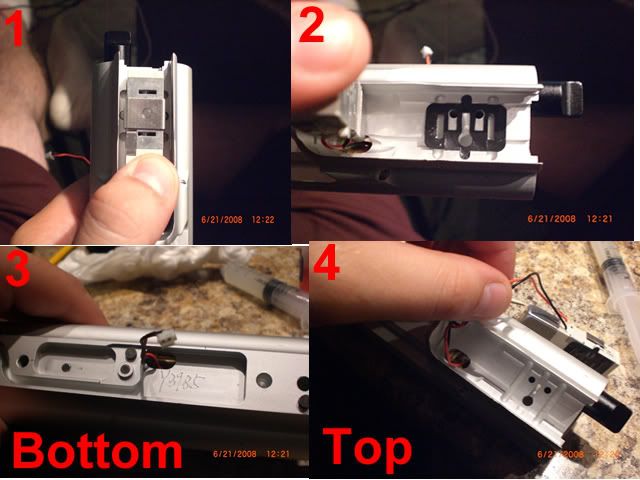
Board Removal
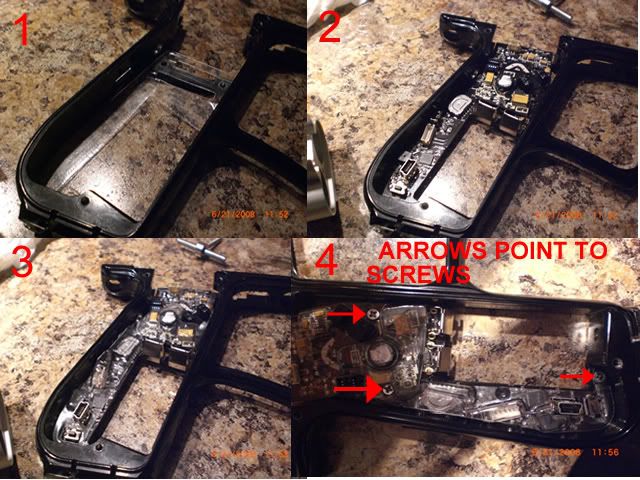
The Board is in the frame held in by 3 phillips head screws which are indicated by the arrows. Remove the screws, then remove the first protective plastic cover, remove the board, then remove the final plastic cover and you now have an empty frame. The order of this step is incorrectly marked in the photo. It should go 4,3,2,1.
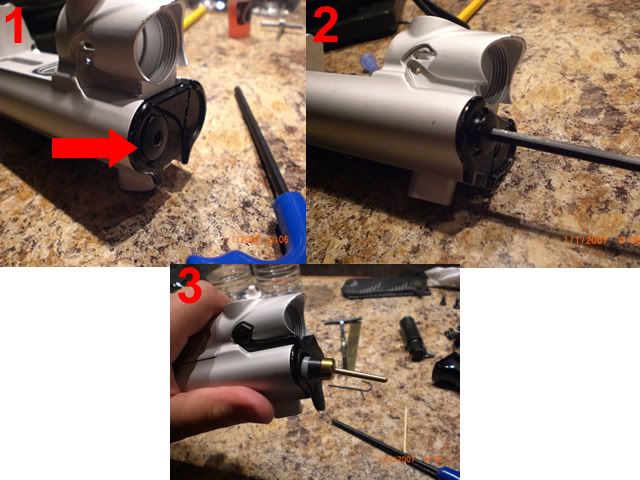
Feedneck Removal

To remove the feedneck, you must first open the latch, and unscrew the cap indicated with the arrow. Once that unscrews, you can remove the latch from the assembly. Once the latch is removed, the outer cover will slide right off. The inner neck will be difficult to remove as loctite has probablly been used. I took a small "shim" if you will, and used it as indicated in the picture to aid me in removing the neck.
__________________
"Better Anodizing Through Science" Click for details DvS
Last edited by LTHG : 07-22-2008 at 12:07 PM.
|

|

|
 Sponsored Links
|
Remove Advertisement
|
|
Advertisement
|
|
|
07-21-2008, 07:27 PM
|
#2
|
|
www.anodizeworld.com
Join Date: Dec 2007
Location: Michigan
|
Bolt Removal:
Again, if you cannot complete this task DO NOT PROCEED! Turn breech knob in the back of the gun, open breech, and slide the bolt out. Nothing more, nothing less.
Mini-Reg Removal
To start this step, you must turn the gun upside down and look down the macroline fitting. You will see an allen socket, 4mm. Take a wrench and loosen it up, once it is loose you should be able to unscrew it with your fingers. Once the cap is off, you will see the mini reg which is recessed about a half inch in the housing. To get it out, you must remove the velocity screw on the side of the housing, and then you must get either your 3mm angel mini-reg tool, or something threaded to 3mm. Look down into the housing and you will see 6 small holes. The middle 2 are threaded. Thread your tool into the holes, and gently pull. The mini reg should slide right out.
Housing Removal
Once the Mini-Reg is out, you can look down the housing and you will see 1 screw, 4mm. Take a T-Wrench, and remove the screw. The reg housing will slide right off.
Eye Covers, Eyes, and Detents
These are instructions on how to remove the old 1 piece covers, I just got the gun and have not ordered the 3 pieces yet. Take a broad object, and slide it under the eye cover near the detents. the plastic will pop out of its hole. Slide it up, so it stays out of place. Now go to the other side and do the same thing. Once you have both sides out of the slits, the covers will slide back. Just be sure not to put too much force on them, other wise they will break. To remove the detents, just pull them out. When removing the eyes, take a toothpick and go in from the detent hole and pop the eyes out from within, its a much better way to do things rather than to tug the ribbon from the outside. set the eyes aside so you dont loose or damage them.
Back Plate Removal
The Back Plate is held on with a single 2mm screw, indicated by the arrow. Loosen the screw, and pull the backplate off.
Solenoid Cover
To remove this, the backplate must come off first. This is also held in with 1 set screw, 2.5mm, which is indicated by the arrow. Once the set screw is removed, the cover will slide out the back. However, the cover is a very very tight fit, so sliding it in and out might be a little difficult. When re-installing it, make sure it is seated properly before trying to jam it in. It has little tracks it slides into.
Solenoid Removal
The solenoid, once the cover is removed, will just pull right out. The second picture in the sequence, is the gasket. This gasket, when you remove the noid, might either be on the bottom of the noid, or the top of the gun like mine. So if you remove the noid, and see nothing where mine is pictured, dont freak out, look at the bottom of the noid and it will be there. Gently tug the wire that feeds into the gun. It does through the top of the gun, past the LPR, and out a hole in the bottom of the gun.
__________________
"Better Anodizing Through Science" Click for details DvS
Last edited by LTHG : 07-22-2008 at 12:08 PM.
|
|
|
|
|
07-21-2008, 07:28 PM
|
#3
|
|
www.anodizeworld.com
Join Date: Dec 2007
Location: Michigan
|
LPR Cap Removal
Simple Step, with the backplate removed, you will see a plug. This plug just needs to be removed. Its a 4mm Allen socket.
Valve Cap Removal
Another simple step. Take a 4mm Allen Wrench, and remove the cap. If the valve stem does not come out with the cap, look inside the valve chamber, and remove it.
Front Cap Removal
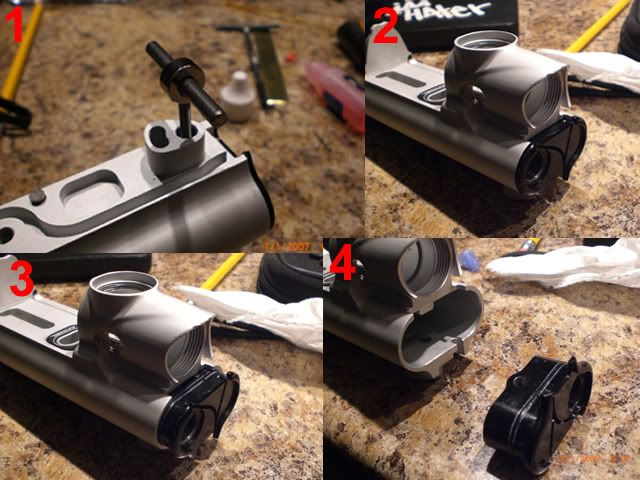
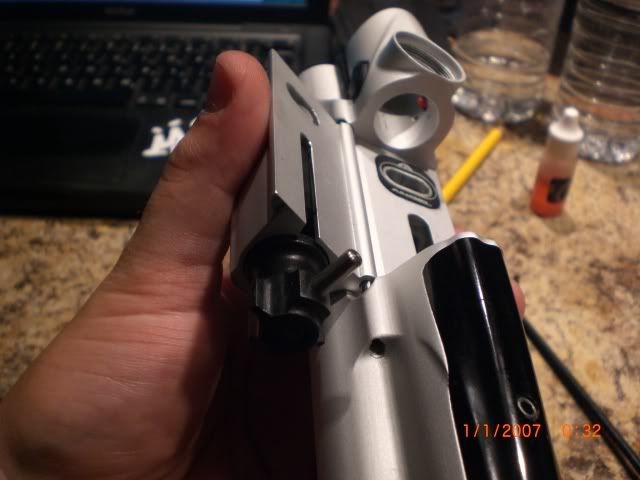
This step also requires either the Angel tools or something that is threaded 3mm. To remove the front cap on your Angel, turn the marker over and look at the place where the reg housing attached. you will see 2 holes. The round hole towards the front of the gun, has a pin inside of it. This pin is threaded to 3mm. Take your 3mm extraction tool, and thread it in the pin. Once it is threaded, pull. This can be easy for some, and very difficult for others. Once you get it out, before you replace it, put a coating of grease on it so its easier to remove in the future. Once the pin is out, the front cap will pull right off from the front. You might have to grab it with your fingernails to get it away from the gun at first, but it will come off. Once it starts to come off, it should slide out very easily.
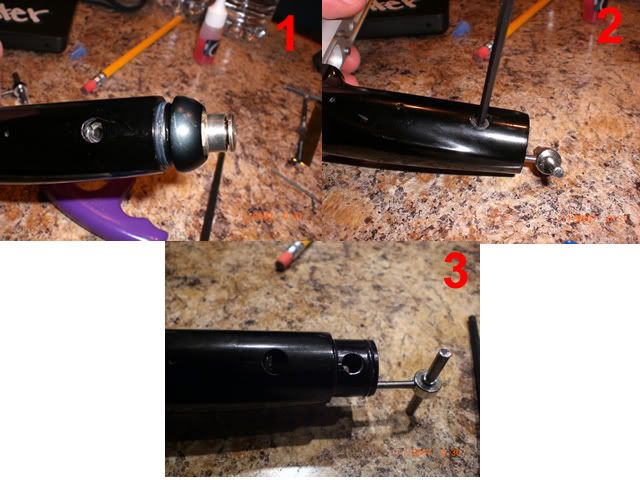
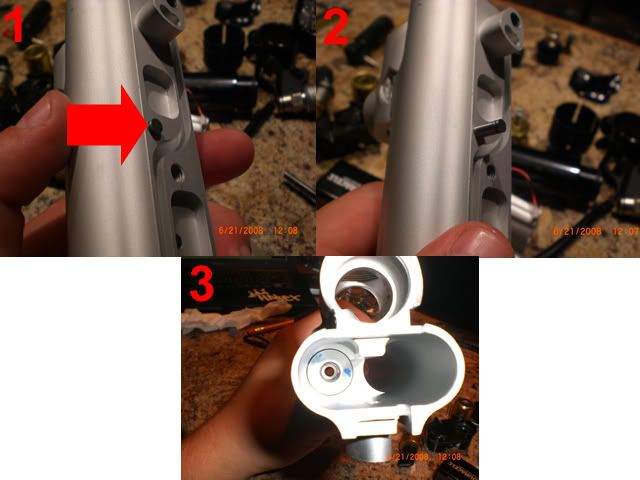
Breech Removal Pt 1

This step can be time consuming especially if you don't have a 1.5mm T-Wrench, like I didn't. I had to use a small one I found laying around. To remove the breech you must look down the holes on either side of the breech, once you see them, inside each one is a little 1mm set screw. Remove each of these with a 1.5mm allen wrench, be patient, it will take a few minutes per screw, but eventually they do come out. These screws are indicated by the arrows.
Breech Removal Pt 2

Once the set screws are removed, its time to remove the pins. Down the same holes the screws came out of, the pins are located. The pins themselves are what acts as the "hinge" to the roto breech. To remove them, you must take something threaded 2mm, and insert it into the hole and thread it slightly, once it is threaded, just pull. The pins should come out with little to no resistance. This needs to be done twice, just like the set screws. Once these pins are removed, the breech should just pull right out.
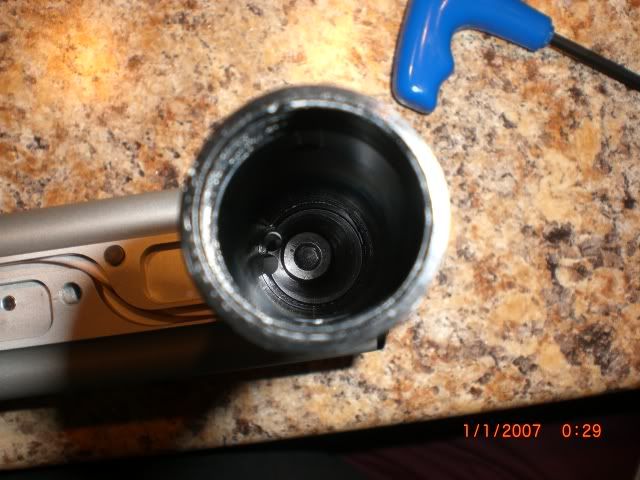
LPR Removal
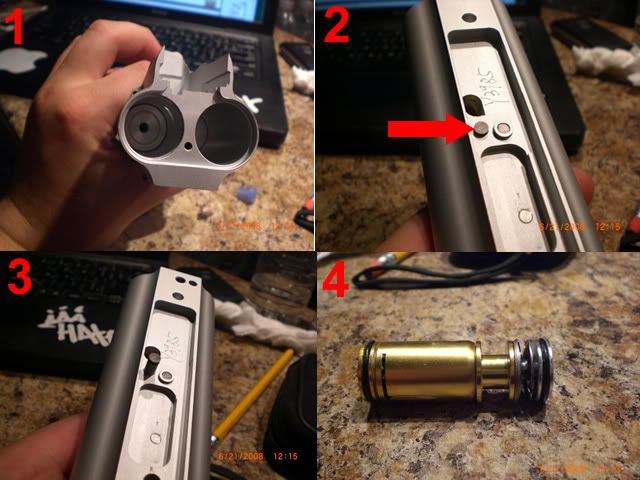
To remove the LPR you need to flip over the gun, and you should see 3 pins that are sticking up a little. The middle pin is holding the LPR in place. To remove it, use your fingers or a pair of small pliers, and just pull up. Once the pin is removed, take your 3mm threaded Angel tool or homemade tool, and thread the LPr onto it. Once it is threaded, pull. The LPR might come out as 1 unit, or in several pieces. As long as you put it back together properly, it does not matter how it comes out.
The Shim Stack MUST go back together like this. |||||| )() The curved shims must go in that order. As for the thin flat ones, every gun will have a different amount as every gun is slightly different. Look at the picture of the LPR for guidence as to how it does back together properly when re-installing in your gun.
Ram Removal
To remove the ram, turn the gun over and look for the pin sitting in the very rear of the gun. Take your fingers or a small pair of pliers and pull up on the pin. It should slide right out. Once this pin is removed, you will be able to pull the ram right out the back of the gun. Use the breech knob for grip.
Valve removal
The last step is removing the valve. Turn the gun over and look for the forward most pin. Take your fingers or a small pair of pliers and lift up. The pin should come right out. Once this pin is removed, take a pencil, or something soft, and push the valve out of the front of the gun, not the back.
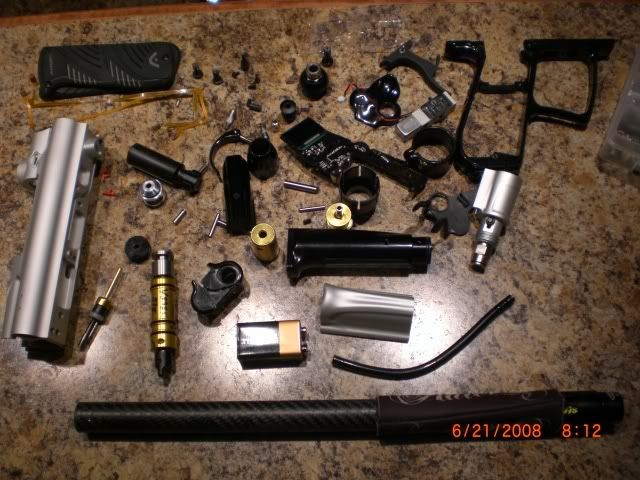
Once the valve is removed, you will have a pile looking like this:
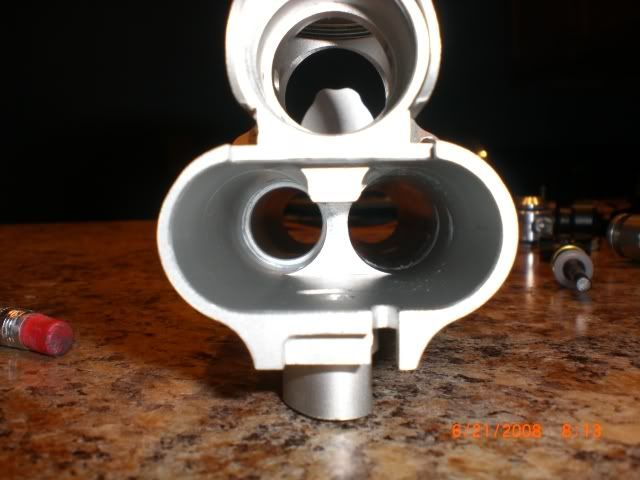
 And a body looking like this:
Thanks for reading the tutorial, I hope this helps. If anyone has any other ?? about any specific step, I will be more than glad to answer them. Just drop me a PM.
--LTHG
__________________
"Better Anodizing Through Science" Click for details DvS
Last edited by LTHG : 01-10-2009 at 05:21 PM.
|
|
|
|
|
07-21-2008, 07:29 PM
|
#4
|
|
www.anodizeworld.com
Join Date: Dec 2007
Location: Michigan
|
And one more time.
__________________
"Better Anodizing Through Science" Click for details DvS
|
|
|
|
|
07-21-2008, 07:51 PM
|
#5
|
|
Iss Go'n Rain!
|
Can't wait!  for disassembly videos. I know my way around an angel, but if thoroughly made, this will help a LOT of people. |
|
|
|
|
07-21-2008, 07:56 PM
|
#6
|
|
|
Quote:
Originally Posted by Khandra

Can't wait! for disassembly videos. I know my way around an angel, but if thoroughly made, this will help a LOT of people. |
DAWT |
|
|
|
|
07-21-2008, 07:58 PM
|
#7
|
|
paintball=drama
Join Date: Sep 2007
Location: 570 should be 631
|
Quote:
Originally Posted by PMR4LIFE
DAWT
|
DAWT to the DAWT
__________________
Allied MVP West Point Spring Combat Classic 09.
Kappa Sigma
|
|
|
|
|
07-21-2008, 08:02 PM
|
#8
|
|
Iss Go'n Rain!
|
You should also take the time to mention any problems that occur in a gun while covering that area, and how they are caused and how to fix them.
|
|
|
|
|
07-22-2008, 12:40 PM
|
#9
|
|
www.anodizeworld.com
Join Date: Dec 2007
Location: Michigan
|
Tutorial Finished.
__________________
"Better Anodizing Through Science" Click for details DvS
|
|
|
|
|
07-22-2008, 12:58 PM
|
#11
|
|
TPB Punishers
Join Date: Sep 2003
Location: Acushnet, MA
|
Really nice.
You may find it better yo screw the velocity screw into the minireg and leave it there when you remove the minireg cartridge from the housing to minimize the lose of the screw and the ball bearing movement inside.
|
|
|
|
|
07-22-2008, 02:08 PM
|
#12
|
|
Playin' since the Y2K
Join Date: Jun 2004
Location: Westchester, NY
|
Nice.
|
|
|
|
|
07-22-2008, 06:08 PM
|
#13
|
|
i can has chzbrgr?!
Join Date: Sep 2007
Location: Ankara, TR
|
Really good job ! |
|
|
|
|
07-22-2008, 11:50 PM
|
#14
|
|
The Angel Eye Doctor
Join Date: May 2003
Location: Earth
|
Those countertops aren't a good surface for this type of work. Everything blends in with them and they're hard so that **** can roll and bounce 
Not too shabby though!
It could also be noted that the "tools" from the WDP/APS kit can be replaced simply by using an appropriately threaded screw with a pair of vice grips or pliers. The stock tool or a custom-made T-handled getup like you've got is nice, but you can get it done with just a screw. |
|
|
|
|
07-23-2008, 04:57 AM
|
#15
|
|
www.anodizeworld.com
Join Date: Dec 2007
Location: Michigan
|
^^Believe it or not, its unbelievably hard to find threaded screws that are the right size which are long enough to use with ease by them selves. The longest 2mm screw I found, which I used to remove the breech pins was about an inch long. The longest 3mm screw I found was a little longer at 30mm, and the longest 4mm screw I found was 50mm. And to remove the LPR, 50mm is not gonna cut it. It sits about flush with the body. Good luck screwing it in, let alone removing it.
Of course this is not to say they dont make screws or threaded rod thats longer. But something like that is very hard to find, especially locally for many people. Im just fortunate enough to have all and any tools I could ever want right here at home. So I just welded some steel rods to my screws to make my own "tool" if you will. Im also a firm believer of if you are gonna do anything, do it right.
I stay away from the screw and plier combo because it tends to end up in scratched anno for those who are not patient and careful.
__________________
"Better Anodizing Through Science" Click for details DvS
|
|
|
|
|
07-23-2008, 05:17 AM
|
#16
|
|
The Angel Eye Doctor
Join Date: May 2003
Location: Earth
|
Yeah, big box hardware stores don't usually have a great selection of metric screws under about M5. Local places and hobby shops are more likely to have the right size. Not everybody gets a tool kit with the gun if they buy used, so if you can find the appropriate screw, it's at least an option.
|
|
|
|
|
07-30-2008, 01:17 PM
|
#17
|
|
|
Good job this should be stickied, i found it easier to understand than the manual.
|
|
|
|
|
07-31-2008, 12:22 AM
|
#18
|
|
Dr Nick
Join Date: Feb 2007
Location: Seattle, WA
|
Perhaps I should make a similar guys showing simple maintenance like basic lubing. Would you guys find that helpful?
__________________
DBS FLOOD
Formerly of DBS Kidz 2, DBSPaintball.com and DBS Titans
|
|
|
|
|
07-31-2008, 04:18 AM
|
#19
|
|
WotWor
Join Date: Mar 2005
Location: Canada
|
That's already been done. Check the stickies.
Thanks for this, although it's kinda late for me. And damn your gun is clean. I bought my A1 used, saving it from an abusive owner, and despite my best efforts at cleaning (completely disassembling and cleaning everything) it's still a bit dirty.
__________________
BrUp
Last edited by Stupified : 07-31-2008 at 04:37 AM.
|
|
|
|
|
07-23-2009, 02:00 PM
|
#20
|
|
Guest
|
why isn't this stickied??
|
|
|
|
|
07-23-2009, 02:11 PM
|
#21
|
|
still sick of idiots
Join Date: Feb 2007
Location: Las Vegas, NV
|
js you should know better than to up an old thread, but it should've been stickied with the lube thread i made that is in the sticky.
|
|
|
|
 Posting Rules
|
You may not post new threads
You may not post replies
You may not post attachments
You may not edit your posts
HTML code is Off
|
|
|
|


 Your Privacy Choices