Find fields & stores near you!
Find fields and stores
Zipcode
PbNation News
PbNation News
Community Focus
Community Focus

Reply
 
Thread Tools
Old 09-06-2006, 03:45 PM #1
pdogg6
Controlled Revenge
 
pdogg6's Avatar
 
Join Date: Oct 2003
Location: AL
 has been a member for 10 years
Official Alien Help Thread

Welcome Alien Users! Mind's Eye and Myself wanted to develop this thread to assist anyone who may have an issue with their marker that has since been resolved by either us other users or the “Creator” . Great thanks to Mind's Eye for creating the Troubleshooting guide section of this thread and also others(users with the problemas YOU KNOW WHO YOU ARE)! This thread wouldn't be possible without you guys!

The basic outline for this thread is for your 1st post is known techinques to cure issues of the past. For your 2nd post, It is composed of supported threads created by other owners(yourselves) in which a issue occured and a solution was rendered. Anyone can use this as an idea for starters and feel free to add information, reformat it, add thread links or correct any mistakes:

Alien Troubleshooting Guide
Before attempting any repairs it is best to download the manual for your Alien marker and read it thoroughly to familiarize yourself with the workings of the gun. Many problems can be taken care of by lubing and re-balancing the regs, making a board adjustment or by simply changing to a fresh battery. If you have a leak you will want to learn how to dis-assemble the gun and air it up. That way you'll be able to isolate where the leak is coming from.

Leaks- Dis-assemble the marker and air up to isolate the leak. You can use a drop of soapy water to help you “see” the escaping air bubbles. One Alien owner has recommended using a nurse's stethoscope with the bell end removed to listen for the leak.

Hose Leak- Check both ends of the air hose at the barbs.
1. Replace hose with Cocker hose

Solenoid/Ram Area Leak-
1.Turn down LPR to stop solenoid venting.
2.Check that the solenoid gasket is clean and in good shape. Tighten down the solenoid screws. Teflon tape or blue Loctite may be used to prevent the screws from backing out.
3.For the Interceptor/Remains: Check for leak at the small set screws in the ram housing above the barb. The set screws are Allen .035 (very small). Use Loctite primer #7649 or blue Loctite but use sparingly as an excessive amount can get inside the ram seals.
For the INDY: set screw is right next to where the wires go into the noid. Screw that counter clockwise until the leak stops.
4.Dis-assemble ram housing and check/replace seals.
5.If solenoid continues to leak or vent excessively, replace solenoid.

Front Block Area Leak-

Interceptor- Front block set screws have been known to come loose causing problems. If the front block begins to loosen remove the set screw and re-assemble with blue Loctite.
1.Check LPR to front block sealing o ring.
2.Check front block o ring. This o ring may be damaged. On some 06's the wrong o ring has been installed. Replace with 14mm o ring with 2mm walls (18mm outside). Teflon tape under the o ring has also been successfully used.

Remains- The Remains does not have a "front block" but leaks in that body area may come from:
1.Check LPR body o rings.
2.Check the HPR ASA o ring.
3.Check the set screw plug to the right and below the LPR. It takes an .050 Allen wrench to remove and reseal with Loctite primer #7649 or blue Loctite.

Valve Leak-
1.If Ceptor is an early 06, Replace valve orings with 14mm oring w/2mm walls (Hardware store or Contact Alienpb).
2.Check valve body o rings for nicks or cuts.
3.Replace pin seal and spring.

LPR Creep-
1.Replace the HPR sealing o ring in the LPR.
2.Check LPR piston for dirt and relube.
3.Replace the LPR cup seal.

Sticky Trigger-
1.Adjust trigger tension screw.
2.Check for loose trigger plate screws.
3.Remove trigger plate and check spring. On rare occasions the spring may have wrapped itself around the set screw. Remove set screw entirely and unwind spring from the set screw. Replace set screw and spring.

Low Velocity-
1.Replace battery.
2.Lube and re-balance regs. Some alien owners have achieved good results switching to after market regulators.
3.Lube ramshaft
4.Check air bottle, ASA and macroline for poor performance or restrictions.
5.Raise dwell
6.Check all o-rings
7.Check air passage or air hose for restrictions.

Gun Not Cycling-
1.Replace Battery
2.Lube and re-balance regs. There has been some success in upping the HPR to get more air pressure into the gun during break-in.
3.Check HPA bottle, ASA and Macroline for poor performance or restrictions
4.Raise dwell
5.Check all o rings
6.Check air passages and air hose for restrictions.

Poor Consistency-
1.Replace battery
2.Borrow aftermarket reg from a buddy.
3.Lube and re-balance regs
4.Lube ram shaft
5.Raise dwell

Trigger Pull Not Registering-
1.Bypass the eyes when dryfiring. Turn on board, tap trigger once, depress button again and hold 1/2 sec. until light flashes rapid red.
2.Adjust trigger travel points to activate trigger switch.
3.Check for pinched, cut or disconnected trigger switch wires.
4.Eye harness pin plug incorrectly installed. Turn plug around.

Eyes/Chopping-

Eyes Working?- no
1.Check that board is set in Eye Mode 1 or 2 (board Eye Mode settings #2 and #3).
2.Check for pinched/cut wires or a wire pulled out of the pin plug at the board connection.
3.Clean eyes
4.Check roll back of paintballs behind eyes due to bolt/ram position. (FIX*-add spacer behind ram to add length contact Alienpb)

Eyes working?- yes
1.Install new battery.
2.Check battery in hopper and adjust hopper speed.
3.Check for worn or improperly fitted detents.
--for Double feeding/Ball just rolls out of barrel--
Check for required o-ring needed between detent and the eye cover.
4.Raise Eye Power or BIP on the board.

Names of Screws used on Alien Markers for replacements

- Socket Head

- Button Head

- Flat Head

- Set Screws

Interceptor screw chart - created by your very own SuperMod and Mind'sEye view Alien OG links below under "downloads"
530.344.1155

Wiring Diagram for 05/06 Aliens w/WAS board:
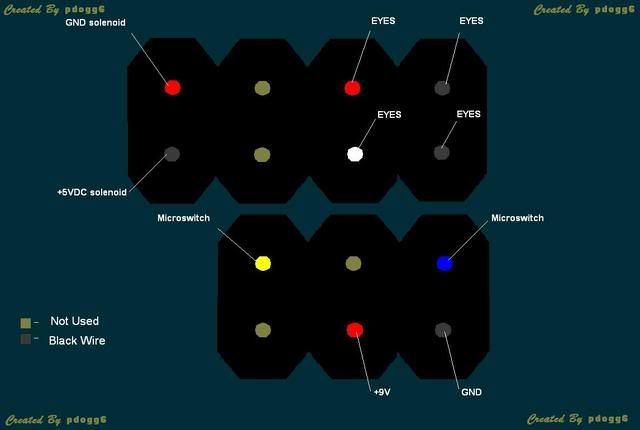
__________________
-P.D.-

Alien Interceptors
Alienpb

PBNation feedback

Last edited by pdogg6 : 07-08-2008 at 10:58 AM.
pdogg6 is offline   Reply With Quote
Old Sponsored Links Remove Advertisement
Advertisement
Old 09-06-2006, 03:46 PM #2
pdogg6
Controlled Revenge
 
pdogg6's Avatar
 
Join Date: Oct 2003
Location: AL
 has been a member for 10 years
This list composes of problems that have arisen and have been resolved successfully since 01/2006. Let me know if it helps! or if I made any mistakes .

I thought I would make a thread with all the issues and resolutions I thought to be useful and maybe it will help other search for solutions easier since the search engine is commonly down when we need it the most.

Leaks
Leaking around the barbs?

Starts to leak then stops

Front Block

Ram housing

Noid Leaking

Noid Leaking 2

INDY Noid Leak

Leaks from valve


Trigger
Sticky Trigger


Consistency
Lpr Creep

Lpr Creep 2

Velocity

Low Velocity

06 Shootdown 1

06 Shootdown 2

Bolt
Bolt pin loose

Bolt shooting air in my face


Electronics
05 Ceptor On/Off

Noid not activating

Wiring Harness

Front block wiring

Batteries don’t last

Will not enter Trigger programming


Ball-Breakage
Ball Breakage(Jack refers to the thread below)

thoughts on breaking/choppping

Double feeding/Ball just rolls out of barrel


AlienOG Links
Issue resolver 05’ Ceptors

Issue resolver 06‘ Ceptors

Link to Downloads page on AOG. ( Must have an account to view)
__________________
-P.D.-

Alien Interceptors
Alienpb

PBNation feedback

Last edited by pdogg6 : 07-08-2008 at 10:56 AM.
pdogg6 is offline   Reply With Quote
Old 11-02-2006, 04:52 PM #3
theroo
rokinalien
 
Join Date: Nov 2006
 has been a member for 10 years
I have an 06' interceptor

Out of the box it was chopping paint.

i found that the balls wouldnt fit down the barrel so i got a new barrel kit.

now there arent any breaks in the barrel but there is a large amount of velocity drop off after the first shot and than it gets lower as i shoot faster

How should i fix this problem?

i also chopped 1 ball after i fit the balls to the right size barrel linsert.
theroo is offline   Reply With Quote
Old 11-02-2006, 05:14 PM #4
Mind'sEye
Mad Money
 
Mind'sEye's Avatar
 
Join Date: Jul 2005
Location: Los Alamos, CA
 has been a member for 10 years
Quote:
Originally Posted by theroo View Post
there is a large amount of velocity drop off after the first shot and than it gets lower as i shoot faster
Shootdown in the 06 Interceptors seems to have been isolated to bad o-rings in the HPR: https://www.pbnation.com/showthread.php?t=1827833 (post #3). Jack has promised to get new o-rings out to anyone who needs them when he returns from the PSP World Cup.
Mind'sEye is offline   Reply With Quote
Old 11-02-2006, 08:57 PM #5
Alien 4 Life
Guest
 
Join Date: Nov 2006
i got my 06 interseptor the other day, i was just wondering how easy it is to like grease the ram and reg or should i ask a demonstration from the guy i bought it from first.l is the reg and ram all u have to grease or is there more.
Alien 4 Life is offline   Reply With Quote
Old 11-03-2006, 09:36 AM #6
pdogg6
Controlled Revenge
 
pdogg6's Avatar
 
Join Date: Oct 2003
Location: AL
 has been a member for 10 years
The 06 shootdown has been updated. I also added something to the troubleshoot section on consistency.
__________________
-P.D.-

Alien Interceptors
Alienpb

PBNation feedback
pdogg6 is offline   Reply With Quote
Old 11-05-2006, 02:34 PM #7
Alien 4 Life
Guest
 
Join Date: Nov 2006
so for the regs, do u just have to screw them off and oil the o-rings (like no taking the regs aparts)? and is it easy to get to the ram?
Alien 4 Life is offline   Reply With Quote
Old 11-05-2006, 03:53 PM #8
Exit Wounds
doesn't play paintball.
 
Exit Wounds's Avatar
 
Join Date: Jul 2005
 has been a member for 10 years
You need to take the reg apart to oil the orings inside it. It is very easy to get to the ram, read the manual stickied at the top of the forum for more information.
__________________
Feedback
Exit Wounds is offline   Reply With Quote
Old 11-06-2006, 06:32 PM #9
Alien 4 Life
Guest
 
Join Date: Nov 2006
my alien seems to be leaking from the barrel, this is most likely the ram right? and its easy to clean/lube it myslef right? like theres no small pieces to lose or things that will easily break. thx for the help.
Alien 4 Life is offline   Reply With Quote
Old 11-06-2006, 06:51 PM #10
Mind'sEye
Mad Money
 
Mind'sEye's Avatar
 
Join Date: Jul 2005
Location: Los Alamos, CA
 has been a member for 10 years
This stuff was stickied here to help you figure out what your problem is if you don't want to send the gun into AlienPB for repairs. Download and read the manual. Learn how to safely dis-assemble the gun and air it up. Then you can begin to isolate where your leak is coming from. Known leaks and fixes are listed in the guide above. Give it a try first.
Mind'sEye is offline   Reply With Quote
Old 11-07-2006, 08:39 AM #11
pdogg6
Controlled Revenge
 
pdogg6's Avatar
 
Join Date: Oct 2003
Location: AL
 has been a member for 10 years
Quote:
Originally Posted by Alien 4 Life
my alien seems to be leaking from the barrel, this is most likely the ram right? and its easy to clean/lube it myslef right? like theres no small pieces to lose or things that will easily break. thx for the help.
I wouldn't conclude it as the ram. I would read the manual and isolate the leak as Mind's Eye suggested. Internal leaks can easily be heard down the breach or the side.
__________________
-P.D.-

Alien Interceptors
Alienpb

PBNation feedback
pdogg6 is offline   Reply With Quote
Old 11-08-2006, 07:28 AM #12
rluna
Moderator
 
rluna's Avatar
 
Join Date: Dec 2002
rluna is a Moderator
rluna is a Supporting Member
 has been a member for 10 years
rluna is playing at Living Legends III
leak down the barrel... if you push the bolt forward all the way is the leak down the barrel louder? if yes, its the valve.

Quote:
1.Check to see that valve set screw has not been over tightened compressing (squishing) valve body o rings.
THis is a dangerous one. Maybe it should be reworded as i think people will mess with the valve set screw while the marker is aired up. If this is in reference to the over-bored valve area in a few '06 Interceptors then you should speak to that specificaly. And instead of messing with the set screw, simply get bigger o-rings - 14mm with 2mm walls.
__________________
Excessive force does indeed answer all questions if there is no one left to ask them....
My Old Feedback

My E-Blazer,
My Markers... The Osirus is... (sold)
rluna is offline   Reply With Quote
Old 11-08-2006, 08:56 AM #13
Mind'sEye
Mad Money
 
Mind'sEye's Avatar
 
Join Date: Jul 2005
Location: Los Alamos, CA
 has been a member for 10 years
Quote:
Originally Posted by rluna View Post
leak down the barrel... if you push the bolt forward all the way is the leak down the barrel louder? if yes, its the valve.


THis is a dangerous one. Maybe it should be reworded as i think people will mess with the valve set screw while the marker is aired up. If this is in reference to the over-bored valve area in a few '06 Interceptors then you should speak to that specificaly. And instead of messing with the set screw, simply get bigger o-rings - 14mm with 2mm walls.
Good point. The whole line can be removed. I cranked the valve set screw down on both my guns and did not get a leak. This is in reference to specific instructions which another ram poppet gun, the Bushmaster, included in it's manual: Snug the valve set screw down but do not over tighten or the valve may leak. It makes sense if the set screw forces the o-ring surface on the opposite end to compress to the point where there may be a tiny gap created at set screw side. Maybe the bushmaster had slightly larger tolerances. Anyway, just drop the referance. This was written more as a guess, before we learned about overbore problem.
Mind'sEye is offline   Reply With Quote
Old 11-08-2006, 09:03 AM #14
pdogg6
Controlled Revenge
 
pdogg6's Avatar
 
Join Date: Oct 2003
Location: AL
 has been a member for 10 years
Quote:
Originally Posted by rluna
THis is a dangerous one. Maybe it should be reworded as i think people will mess with the valve set screw while the marker is aired up. If this is in reference to the over-bored valve area in a few '06 Interceptors then you should speak to that specificaly. And instead of messing with the set screw, simply get bigger o-rings - 14mm with 2mm walls.
Oh my great catch Rluna. I hate someone to be on the recieving end of that rocket. Im on it!

Quote:
Originally Posted by Mind's Eye
Good point. The whole line can be removed. I cranked the valve set screw down on both my guns and did not get a leak. This is in reference to specific instructions which another ram poppet gun, the Bushmaster, included in it's manual: Snug the valve set screw down but do not over tighten or the valve may leak. It makes sense if the set screw forces the o-ring surface on the opposite end to compress to the point where there may be a tiny gap created at set screw side. Maybe the bushmaster had slightly larger tolerances. Anyway, just drop the referance. This was written more as a guess, before we learned about overbore problem.
Its not that Bushy have a larger tolerance but that alien milled into their valve with an oval shape reservior for the set screw. I wonder why alien milled in to value with an oval shape instead of a fitted circle for the allen set screw like other markers? It works on other markers b/c even if you unscrew the set screw a bit its still locked into place because the reservior is fitted for the allen screw.

Anyway it will be removed.
__________________
-P.D.-

Alien Interceptors
Alienpb

PBNation feedback

Last edited by pdogg6 : 11-08-2006 at 09:15 AM.
pdogg6 is offline   Reply With Quote
Old 11-08-2006, 10:06 PM #15
MPBIGSEXY
The Padrino of PB
 
MPBIGSEXY's Avatar
 
Join Date: Aug 2002
Location: orlando, fl
MPBIGSEXY is a Supporting Member
 has been a member for 10 years
Played last Saturday and got a loud leak coming form the Ram/noid area. After going thru this thread and the manual i confirmed that. Just repairing it i couldnt do, so im sending the gun in. But wanted to say thanxs for everyone who put in tips and common issues with these markers.
__________________
Current marker:
05 Alien Interceptor
'04 Crossfire C.fiber 68/45K Tank
Halo b hopper

Gearbag sale:https://www.pbnation.com/showthread.p...3#post56150783

FEEDBACK THREAD:https://www.pbnation.com/showthread.p...4#post20296414
MPBIGSEXY is offline   Reply With Quote
Old 11-12-2006, 11:39 AM #16
xspyder
Guest
 
Join Date: Jan 2006
how do u adjust the air pressure? screw it in out out on the lpr? thanks

aNdY
xspyder is offline   Reply With Quote
Old 12-08-2006, 10:34 PM #17
Yo_Jimbo
Guest
 
Join Date: Jan 2006
I am having trouble with my eye settings. I have my 06 interceptor set on the default eye mode but when the breach is clear the noid still clicks. Help please...
Yo_Jimbo is offline   Reply With Quote
Old 12-08-2006, 11:46 PM #18
pdogg6
Controlled Revenge
 
pdogg6's Avatar
 
Join Date: Oct 2003
Location: AL
 has been a member for 10 years
Quote:
Originally Posted by Yo_Jimbo View Post
I am having trouble with my eye settings. I have my 06 interceptor set on the default eye mode but when the breach is clear the noid still clicks. Help please...
It could be there is nothing wrong with your eye settings. If your talking about the marker still firing after you have the eye turn on it could mean two things.

1. You have something in your breech, your bolt is forward, or the eyes are dirty so electronically it is seeing something in the breech and it will fire.

2. Your trying to dry fire it and the board does an AUTO bypass. Perfectly normal! For example, you turn the eyes on pull the trigger nothing happens. But if you stick your finger in there for a second and dry fire the board deactivates your eye automatically. I believe its some feature WAS thought up, but its normal.

hope it helps

Reading the manual will help you better understand your WAS board.

-p-
__________________
-P.D.-

Alien Interceptors
Alienpb

PBNation feedback
pdogg6 is offline   Reply With Quote
Old 12-10-2006, 04:00 PM #19
Yo_Jimbo
Guest
 
Join Date: Jan 2006
Thanks sounds like the second one. Well as soon as my screws get here I will see if I do need a new hose lol.
Yo_Jimbo is offline   Reply With Quote
Old 12-10-2006, 05:37 PM #20
Mind'sEye
Mad Money
 
Mind'sEye's Avatar
 
Join Date: Jul 2005
Location: Los Alamos, CA
 has been a member for 10 years
You can test for a leaking hose right now. First read the manual, which tells you how to do this safely. After you study this, you can air the gun up dis-assembled. You do not need the screws to do that.
Mind'sEye is offline   Reply With Quote
Old 12-10-2006, 06:09 PM #21
Yo_Jimbo
Guest
 
Join Date: Jan 2006
well then I will have to go get air. Thanks alot guys hope to be using my baby on the field soon.
Yo_Jimbo is offline   Reply With Quote
Reply


Thread Tools

Posting Rules
Forum Jump