Find fields & stores near you!
Find fields and stores
Zipcode
PbNation News
PbNation News
Community Focus
Community Focus

Reply
 
Thread Tools
Old 11-10-2007, 02:23 AM #1
Muddytaco
Santa, Bring me a Splash Luxe
 
Muddytaco's Avatar
 
Join Date: Jan 2005
Location: Katy, TX
Muddytaco is a Moderator
 has been a member for 10 years
Muddytaco is a Paintball photographer
Muddytaco supports our troops
Muddytaco supports DLX Technology
The complete walkthrough to installing a Ego frame on your MQ Cocker

I take no responsibility for anything you do by following this walkthrough.


Tools/supplies needed:
1. Autococker with MQ valve
2. ’06 Ego frame, stock or star or ‘05 Ego Frame, stock or star (just skip the sections on board mods as E1/E2 is a direct drop in on the ’05 frame)
3. Two ¾” long 10-32 threaded button head screws
4. Delrin or something similar (very small amount needed)
5. Drill press or a vice and hand drill
6. Hacksaw
7. Dremel (not needed but makes some parts faster to do)
8. Misc files, ranging from medium to small to tiny
9. Drill bits, #36, #29 and 3/16” used in this guide (only 3/16” needed the others are used as step bits)
10. Level
11. Misc measuring tools (ruler, tape measure, etc.)
12. T-square
13. Pencil
14. Basic skill and understanding of shop tools and autococker

REMEMBER MEASURE TWICE CUT/DRILL ONCE!


During this walkthrough I will be using a ’06 Star frame and a Eclipse factory cocker (full body).

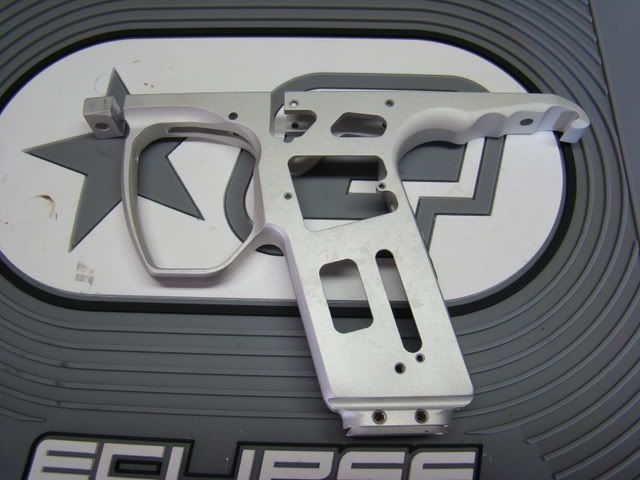
Star frame all stock as it came:


Comparing Star frame to stock E2 w/ samurai trigger, Ego frame trigger guard is bigger, trigger is more comfortable and adjustable, choose between magnetic or spring, lighter and overall just a more comfortable frame:


Step 1: Mounting the board in the frame.


When looking at the two frames and different boards you will discover the first problem when doing this mod, not all of the mounting holes on the board are the same which in turn makes the frame mounting points be in different locations also. In the picture the green circles represent the mounting points that are the same on both frames and both boards, the red circles represent the differences in both. As you can see the two back mounting points are the same but the front mounting points are different on each:


Some might be thinking ok I will just leave out the front mounting screw but there is more to it then just that. As you see below the board will fit in the frame without any mods, it is a very tight fit but it will go in:


I don’t know if you can see it in the picture above but the board is not sitting flush on the mounting points. Where the front mount hole is located on the ego board there is a part soldered on the back of the E2 board:


Picture of it in the frame:


This not only keeps the board from not sitting level but also stops the trigger from fitting in the frame by blocking the front hole that the arm (part that breaks the optical switch) comes in at.

To fix this the front mount point must be grinded down:


To do this I used a dremel with the bit shown in the pic below (there is still pumpkin on the dremel from Halloween incase your wondering what it is):


What it should look like when your done, just bring it down to flush with the the rest of the frame:


As you can see the board now sits flush and the trigger can be installed and pulled all the way back:


This is where another problem pops up, the trigger is rubbing just alittle bit on the inside of the optical switch and creating alittle bit of drag that is stopping the trigger from returning quickly:


To solve this problem just file the trigger arm down just alittle bit.

Stock:


filed:


As you can see it wasn’t very much filing at all to fix the problem.

Now you should have the board perfectly mounted in the frame and trigger fully functioning, all that is left is how to trip the optical switch since it is mounted offset compared to being centered on ’06 boards. This will come at the end of this walk through as the trigger and board need to be removed to cut and mount the frame to the body.


Step 2: Cutting and mounting the frame to the body


How stock frame fits on the body:


How the star frame sits right out of the box:


This is what will be moded during this step in the walkthrough, the front nose will to be cut off to move the frame forward on the body and two new mounting holes will be drilled into the frame. Yes there are others ways to mount it but I find this the most comfortable and best balanced:


Notice by following the next steps you will be cutting off the front mount for mounting on a Ego, once you cut off the front your frame can never be mounted back on a ego again!

First you want to cut the front nose off so the frame can be moved forward to achieve better overall balance. How much you cut off will depend on what vertical ASA you are using. Mine requires that I cut it back alittle farther back then how far the trigger guard sticks out as the vertical ASA on my eclipse body is bigger at the top then the bottom. Measure twice cut once! I also left about 1/8” of material to file down to the perfect size instead of going for it all at once.

Line marked for cutting:


I am using a hacksaw with a fine metal cutting blade for this part. I put the frame in a vice with a towel around it to protect it from the vice itself. Once in the vice you want to use a level to make sure it is nice and level before you proceed with cutting:


You should end up with something like this:


Last edited by Muddytaco : 11-10-2007 at 02:38 AM.
Muddytaco is offline   Reply With Quote
Old Sponsored Links Remove Advertisement
Advertisement
Old 11-10-2007, 02:24 AM #2
Muddytaco
Santa, Bring me a Splash Luxe
 
Muddytaco's Avatar
 
Join Date: Jan 2005
Location: Katy, TX
Muddytaco is a Moderator
 has been a member for 10 years
Muddytaco is a Paintball photographer
Muddytaco supports our troops
Muddytaco supports DLX Technology
After some filing you should have a nice fit on the body:


Now that the frame is cut to the proper length it is time to drill the front mounting hole. This can be alittle tricky for the first timer so I am going to list some pointers. First you want to measure from the back of the ASA to the center of the mounting hole in the body, this will give you the distance of where your hole needs to be located front to back. Transfer this to your frame, use a T-square to insure the line is straight across on your frame. Now that you have front to back location of your measurement you need to find the center of the frame, you could measure to find the center but a even easier way to find it is that the magnet located in the frame is mounted directly in the center of the frame. Using a T-square you can easily transfer the center up to your first measurement line, you should end up with something like this:


A easy way to double check your center measurement is to turn your stock frame upside down and lay it on top of the ego frame, like so:


Now when you look through the front mounting hole on the stock frame you should see your crosshair dead center in the hole, this is not to be used for front to back placement as it will be different since the ego frame goes all the way up to the ASA while the stock does not:


Now that you know your measurement is all correct, put you frame back in the vice and level it once again:


Now your going to drill the front mounting hole. For this I recommend two things, first use sharp drill bits and second use 3 different drill bits that gradually get bigger. For this I am starting with a #36 then going to a #29 and finishing with a 3/16” which is the size needed for the button head screws to fit through. If your using a hand drill take your time and make sure everything is line up and straight, you only have one shot to make it through straight! I highly recommend a drill press, I used a hand drill in this only b/c the gear belt broke on my drill press and I am stilling waiting on a new one to arrive. You should end up with something like this:


Mount the frame to insure everything came out ok, mine came out perfect, depending on your body you may need to cut the mounting screws down alittle:


Next you will be drilling the back mounting hole. Get your front to back measurement again but this time your better off measuring to find the center as the magnet is to far away to get a accurate center line. To double check your measurement flip the stock frame back on top again but this time use a screw to hold the front mounting holes inline with each other:


Now look through the rear mounting hole on the stock frame. If you measured right you should see this, once again measuring 3 or 4 times pays off as it is perfect:


If correct its back to the vice, once again level it out:


Use the same step method with the drill bits (#36, #29, 3/16”). Easy way to double check everything after drilling the rear frame hole turn the stock frame over on top of the ego frame and the screws should drop right in on the front and the back:


When you mount it to the body it will look like this:


Step 3: Ways to improve the mounting that are not 100% needed

While that might be good enough for some people, the rear screw sticking out like that really bothers me. I was going to use a countersink bit but there is no room to use a drill at that location, so back to the dremel. Using the same bit as before I hollowed out a area so the screw fits just under flush:


When that is finished the frame is fully mounted and ready to go. As I was checking everything over I noticed the backblock had some rubbing on the back of the frame:


As you can see the two are touching at points, this would rub off the anno of both the frame and backblock over time. Since I am going to anno this frame now I thought I would take care of the problem as the raw aluminum won’t be seeing any field play.

I marked off the area that is exposed to the backblock:


Using misc files I filed down the back of the frame, it does take much to fix all of the rubbing problems:


As you can see there is now clearance between the two:


Last edited by Muddytaco : 11-10-2007 at 02:36 AM.
Muddytaco is offline   Reply With Quote
Old 11-10-2007, 02:25 AM #3
Muddytaco
Santa, Bring me a Splash Luxe
 
Muddytaco's Avatar
 
Join Date: Jan 2005
Location: Katy, TX
Muddytaco is a Moderator
 has been a member for 10 years
Muddytaco is a Paintball photographer
Muddytaco supports our troops
Muddytaco supports DLX Technology
Step 4: Final mounting and trigger moding:

Now it is time for the final step in mounting the frame, the eye cover notch. This is easily done by mounting the frame and then putting on the eye cover. Trace around the eye cover with it on and you have a easy template to cut out:


Make sure to check for fit as your cutting the notch, if it is to big paint can easily get in through the gap, mine is cut so it is a tight fit and kind of hard to put on.

All of the frame moding is now complete! Connect everything back together to move on to the final step.

After getting everything mounted and connected its time for the final step, moding the trigger arm to work with the off set optical switch. For this I used a very small piece of delrin and some epoxy. Cut a small piece of delrin to match the thickness of the trigger and make the length long enough to reach to the eyes of the optical switch, carefully glue it to the trigger. YOU MUST BE VERY CAREFUL WHEN GLUEING THE PIECE ON, DO NOT GET ANY ON THE OPTICAL EYES ON THE SWITCH ITSELF!!!!! Pic of mine, the picture is crappy but I outlined the delrin piece in red:


Turn on the board to check and make sure the trigger is working, if it is congratulations your done!!!!!!

When your done stand back and marvel at your work and your new one of a kind cocker:


Short video of mine on training mode since I finished at 9:30pm and the little kids next door were already in bed:


Last edited by Muddytaco : 11-10-2007 at 02:35 AM.
Muddytaco is offline   Reply With Quote
Old 11-10-2007, 05:11 AM #4
masta_blasta_21
don't matta
 
masta_blasta_21's Avatar
 
Join Date: Oct 2001
Location: Oregon/Alaska
 has been a member for 10 years
wow, perfect
__________________
feedbackhttps://www.pbnation.com/showthread.php?t=1497482
AKA Excal, Custom Milled, RT Valve, For Sale!!!!https://www.pbnation.com/showthread.php?t=2870434

Super Clean E-Cocker, FAST, Ego Feedneck!https://www.pbnation.com/showthread.php?t=2866289
ANGEL ARMY-#19 Closed Bolt Ballers-#61 45 club, member #109
Bonebrake's Warpaint Factory---front---see ya at the 50!
PHI DELTA THETA Oregon Gamma--1116
masta_blasta_21 is offline   Reply With Quote
Old 11-10-2007, 06:30 AM #5
Mr.Dirt
 
 
Mr.Dirt's Avatar
 
Join Date: Aug 2005
Location: CFL
 has been a member for 10 years
Someone might have beaten you to the punchline. https://www.pbnation.com/showthread.p...highlight=star
__________________
Feedback
Mr.Dirt is offline   Reply With Quote
Old 11-10-2007, 06:30 AM #6
andrew_schenk
 
 
andrew_schenk's Avatar
 
Join Date: Jan 2005
Location: Ontario
 has been a member for 10 years
nice walk through!
andrew_schenk is offline   Reply With Quote
Old 11-10-2007, 07:17 AM #7
andrewsyndrm
Guest
 
Join Date: Oct 2007
wow man.. thats one beautiful cocker.
great guide btw, this makes me want to do that to my cocker, but im more interested in half-blocking it.


Quote:
Originally Posted by Mr.Dirt View Post
Someone might have beaten you to the punchline. https://www.pbnation.com/showthread.p...highlight=star
yea, someone beat him, but this is much easier to understand.
andrewsyndrm is offline   Reply With Quote
Old 11-10-2007, 09:43 AM #8
hawaiianking
Resident Enginerd
 
hawaiianking's Avatar
 
Join Date: Jul 2006
Location: Honolulu, Hawaii
 has been a member for 10 years
that other walk through is for 05 frames. the 06 frame is a little different. the board are not a exact fit and the trigger fand is in the center for 06 thats why the delrin piece was added to trip the optical switch. so nice job.

i used the same frame but i kept the maniac board in. i did some extra milling to make it make the body.


hawaiianking is offline   Reply With Quote
Old 11-10-2007, 10:58 AM #9
JoshGrrrr
@!?#%&$
 
JoshGrrrr's Avatar
 
Join Date: Mar 2003
Location: ~BFE~
JoshGrrrr is a Supporting Member
 has been a member for 10 years
JoshGrrrr is playing at Living Legends III
JoshGrrrr supports our troops
Well made guide man. Thanks. It has been added to the guide sticky.

Good, informative threads like this make PBN what it is. It's one thing to just post info, it's another to go above and beyond and take the time to make a thorough guide like this.

Good job.

EDIT: To add a little info...

Having done this mod a few times I find the easiest way to mark the places to drill the holes in the ego frame is to just transfer them from a cocker frame. I just put them together top to top, clamp them together making sure they are lined up, then put the transfer punch through the hole in the cocker frame and tap it with a hammer to punch a dent in the location where I need to drill in the ego frame. You don't necessarily need a transfer punch. Anything that fits the hole snugly and has a sharp point can be used.

Also, there reall is no need to step up from a smaller drill to the proper one. That may make it easier with a hand drill, but with a drill press you should have no problem using the proper size the first time. Just use a center drill or spot drill to make first. This ensures that the drill bit doesn't wander off.

One last thing, if you really want the screw in the back to sit flush you can buy a back-countersink. It goes into a drill chuck. The cutting end de-taches. You take the end off, put it through the hole from the side opposite where you want the countersink, then put the cutting end back on and pull it into the hole. It creates a countersink. We use these to countersink holes that you can't get to, like the one on the back of the frame. I don't own one personally but they aren't too expensive.

Last edited by JoshGrrrr : 11-10-2007 at 11:08 AM.
JoshGrrrr is offline   Reply With Quote
Old 11-10-2007, 11:30 AM #10
abun
hmm...
 
abun's Avatar
 
Join Date: Apr 2007
Location: 81300
 has been a member for 10 years
abun plays in the APPA D4 division
Great job man, cool stuff! hopefully i can do this myself one day.
thanks!
abun is offline   Reply With Quote
Old 11-10-2007, 12:01 PM #11
Muddytaco
Santa, Bring me a Splash Luxe
 
Muddytaco's Avatar
 
Join Date: Jan 2005
Location: Katy, TX
Muddytaco is a Moderator
 has been a member for 10 years
Muddytaco is a Paintball photographer
Muddytaco supports our troops
Muddytaco supports DLX Technology
Quote:
Originally Posted by Mr.Dirt View Post
Someone might have beaten you to the punchline. https://www.pbnation.com/showthread.p...highlight=star
That one doesn't show you how to use '06 frames.


Quote:
Originally Posted by JoshGrrrr View Post
Well made guide man. Thanks. It has been added to the guide sticky.

Good, informative threads like this make PBN what it is. It's one thing to just post info, it's another to go above and beyond and take the time to make a thorough guide like this.

Good job.

EDIT: To add a little info...

Having done this mod a few times I find the easiest way to mark the places to drill the holes in the ego frame is to just transfer them from a cocker frame. I just put them together top to top, clamp them together making sure they are lined up, then put the transfer punch through the hole in the cocker frame and tap it with a hammer to punch a dent in the location where I need to drill in the ego frame. You don't necessarily need a transfer punch. Anything that fits the hole snugly and has a sharp point can be used.

Also, there reall is no need to step up from a smaller drill to the proper one. That may make it easier with a hand drill, but with a drill press you should have no problem using the proper size the first time. Just use a center drill or spot drill to make first. This ensures that the drill bit doesn't wander off.

One last thing, if you really want the screw in the back to sit flush you can buy a back-countersink. It goes into a drill chuck. The cutting end de-taches. You take the end off, put it through the hole from the side opposite where you want the countersink, then put the cutting end back on and pull it into the hole. It creates a countersink. We use these to countersink holes that you can't get to, like the one on the back of the frame. I don't own one personally but they aren't too expensive.
Thanks.

Never thought about using the punch method for the holes.

I agree on using a drill press and 3/16" bit the first time but since mine is down till my new drive belt gets here I found it easier to step up to the 3/16" when using a hand drill.

I didn't know they made countersink bits like that, def. would of been easier then doing it with the dremel.
Muddytaco is offline   Reply With Quote
Old 11-10-2007, 12:37 PM #12
CyberThug
Playing it Bogart
 
Join Date: Sep 2001
CyberThug is a Supporting Member
CyberThug is a founding member
CyberThug is reppin' sidebar 4 life
CyberThug is Legendary
CyberThug is Boss
CyberThug is Immortal
Nice Walkthrough! A+
CyberThug is offline   Reply With Quote
Old 11-10-2007, 01:11 PM #13
kylep2212
The jew who knew
 
kylep2212's Avatar
 
Join Date: Oct 2007
 has been a member for 10 years
=) nice
__________________
Abe Lincoln - "Better to remain silent and be thought a fool than to speak out and remove all doubt."


ive been to arizona...do not want to ever go back there. it was like, "ooo lets go rest by that metal pole" "AHHHH DONT TOUCH THAT ****IN POLL, ITS LIKE 450 DEGREES" "lets go on that rock. *sit* AHHH ITS LIKE 500 DEGREES" lukeg1589
kylep2212 is offline   Reply With Quote
Old 11-10-2007, 01:16 PM #14
dec7td
Livin' the Dream
 
dec7td's Avatar
 
Join Date: Aug 2006
 has been a member for 10 years
So the Star frame LCD slot and buttons match up with the E1/E2 board LCD and button placement without modification? Are there any other frames that do this?

Amazing work btw. Details like this make the world go 'round
__________________
Missouri S&T Prestige - Alumni

Contact me via email (not PM):

danclark.mst (at) gmail (dot) com
dec7td is offline   Reply With Quote
Old 11-10-2007, 03:28 PM #15
andrew_schenk
 
 
andrew_schenk's Avatar
 
Join Date: Jan 2005
Location: Ontario
 has been a member for 10 years
Quote:
Originally Posted by hawaiianking View Post

i used the same frame but i kept the maniac board in. i did some extra milling to make it make the body.
does the maniac board have the right plugs for the MQ, eye and noid?
andrew_schenk is offline   Reply With Quote
Old 11-10-2007, 03:45 PM #16
Muddytaco
Santa, Bring me a Splash Luxe
 
Muddytaco's Avatar
 
Join Date: Jan 2005
Location: Katy, TX
Muddytaco is a Moderator
 has been a member for 10 years
Muddytaco is a Paintball photographer
Muddytaco supports our troops
Muddytaco supports DLX Technology
Quote:
Originally Posted by dec7td View Post
So the Star frame LCD slot and buttons match up with the E1/E2 board LCD and button placement without modification? Are there any other frames that do this?

Amazing work btw. Details like this make the world go 'round
after you cut the front board mounting location out of the frame the board slides right in and the buttons and screen line up.


Quote:
Originally Posted by andrew_schenk View Post
does the maniac board have the right plugs for the MQ, eye and noid?
His is a pump, it only needs the MQ plugged into the ego noid slot. The maniac board won't actually run the cocker like the E2 board, it won't fire the front noid and the eyes are programed for breakbeam.
Muddytaco is offline   Reply With Quote
Old 11-10-2007, 05:43 PM #17
msonic
one case one kill
 
msonic's Avatar
 
Join Date: Oct 2004
Location: the sticks, michigan
Annual Supporting Member
msonic is a Mega Moderator
msonic is a Moderator
msonic is a Supporting Member
 has been a member for 10 years
msonic donated to help Peyton Trent
msonic is one of the top 25 posters on PbNation
msonic is Immortal
excellent!

I have a buddy who is currently trying to decide what frame to use in his mq setup.

This should help him decide.
msonic is offline   Reply With Quote
Old 11-10-2007, 09:04 PM #18
onepointsix
 
 
Join Date: Oct 2005
Location: Cali
 has been a member for 10 years
Good Write Up. I could have not explained it any better.

I do remember seeing someone on here with a Star framed cocker with a tadao board. I would be very interested to find out how to make that setup work.
__________________
Nexus DC2, Turbulence, Midnight Blue, Darkness Black
Blood Red
Orracle, Silver to Black Fade
Team Vanquish Team Captain. #24
PINOYBALLASOCIETY
onepointsix is offline   Reply With Quote
Old 11-10-2007, 09:52 PM #19
andrew_schenk
 
 
andrew_schenk's Avatar
 
Join Date: Jan 2005
Location: Ontario
 has been a member for 10 years
Quote:
Originally Posted by Muddytaco View Post
His is a pump, it only needs the MQ plugged into the ego noid slot. The maniac board won't actually run the cocker like the E2 board, it won't fire the front noid and the eyes are programed for breakbeam.
figured as much
andrew_schenk is offline   Reply With Quote
Old 11-11-2007, 09:10 AM #20
Fortality
MC. LEAN
 
Fortality's Avatar
 
Join Date: May 2005
Location: Wiscompton
 has been a member for 10 years
Fortality plays in the APPA D4 division
if only my ul conversion was that easy!
Fortality is offline   Reply With Quote
Old 11-23-2007, 02:28 PM #21
andrew_schenk
 
 
andrew_schenk's Avatar
 
Join Date: Jan 2005
Location: Ontario
 has been a member for 10 years
quick question, does it matter if i use an E2 or Zero B board in the ego frame? i just wondering about the size of the LCD screen and the size of the window on the frame?
andrew_schenk is offline   Reply With Quote
Reply


Thread Tools

Posting Rules
Forum Jump