 |
|
 07-05-2004, 10:21 PM
|
#22
|
|
Banned
Join Date: Mar 2003
Location: Minnesota
|
**Timing an Autococker**
This is a "how to" thread on how to properly time an Autococker. I have taken everything in this thread from knowledge I have gained from working with Autocockers. I give full credit to Greenkill for the "Trigger Sequence" section. Also much thanks to MikeM for helping me put the final touches on this.
3way hoses
Correct line up of 3way hoses with different frame and 3way positions. The middle hose always goes to the LPR.
Hinge frame w/ 2 oring 3way:
Front - Front
Back - Back
Hinge frame w/ 3 oring 3way:
Front - Back
Back - Front
Slider frame w/ 2 oring 3way:
Front - Back
Back - Front
Slider frame w/ 3 oring 3way:
Front - Front
Back - Back
Backblock Position
Lets focus now on the backblock. Remove the cocking rod, bolt quick pull and the bolt itself. Push the backblock as close to the body as you can. Screw the backblock into the pump arm until it hits the body. At this point you want to unscrew the backblock one turn out so it leaves a very small gap, no more then 1 or 2 finger nail widths wide. Once you have that small gap, put the parts you have taken off back on.
Adjusting cocking rod
Hold your marker so you are looking down into the breech. Pull the backblock all the way back and then release, it will move forward a little bit on its own. How much of your bolt, if any is still showing in your breech? You should be able to see about one to two millimeters of the bolt. If you see more or less then look at the back of your cocking rod, there is a set screw. The size of allen key for that set screw is 5/16" and loosen the set screw. If too much of the bolt is showing then you are going to want to extend the length that the bolt can go. So turn the nut on the cocking rod counterclockwise until only a sliver of the bolt is showing in the breech. If you have a buffer oring infront of the nut, make sure you push that up as well.
If you see no bolt, turn the nut clockwise until you see a sliver in the breech. No point in having your ram work harder then it has to.
Trigger Sequence
This is to show you the proper way the marker should be firing and recocking during the trigger pull. Have your marker degassed. Look on the left side of the trigger frame right above the trigger; see that little groove area with a rod sticking through? Good, now pull the trigger all the way back and take note to the distance that rod traveled.
S = Start of pull
E = End of pull
F = Firing point
A = Actuating point
S---F--A---E
If properly set up, the marker should be shooting between the first 1/4 to 1/2 length of the pull. The marker should be actuating around 3/4 of the length.
The marker is actuating too early or too late
The marker is actuating too early:
Here is a tip to save on air as well as not having to listen to the marker shooting all the time. Remove the cocking rod until your marker is actuating at the right spot. Then screw the cocking rod back in. If the marker is actuating earlier then the last 3/4 length of the trigger pull then we should probably get it actuating a little bit later so we do not interfere with the firing sequence that we just set-up. We are going to need the marker gassed up for this one and have the marker turns so the right side is facing up. Forward of the vertical regulator you will see the actuating collar and it should have two screws; one nearest the regulator and one near the 3way. We are going to adjust the total length of the actuating collar so go ahead and loosen the set screw closest to the regulator. The size of allen key is 1/16". So we are sitting here with the marker actuating too early, what we want to do is lengthen the actuating collar so the marker actuates later in the pull. So go ahead and turn the collar counterclockwise (depending on how you are looking, turn it as though you are trying to remove it). After every fine adjustment pull the trigger and check to see if it is shooting late enough in the pull. If not, keep turning until you find the proper spot. When you're done with that tighten that set screw back up.
The marker is actuating too late:
Here is a tip to save on air as well as not having to listen to the marker shooting all the time. Remove the cocking rod until your marker is actuating at the right spot. Then screw the cocking rod back in. If the marker is actuating later then the last 3/4 length of the trigger pull then we should probably get it actuating a little bit sooner so we don't have it so far back that we risk the chance of not pulling the trigger far enough (IE. Short stroking). We are going to need the marker gassed up for this one and have the marker turns so the right side is facing up. Forward of the vertical regulator you will see the actuating collar and it should have two screws; one nearest the regulator and one near the 3way. We are going to adjust the total length of the actuating collar so go ahead and loosen the set screw closest to the regulator. The size of allen key is 1/16". So we are sitting here with the marker actuating too late, what we want to do is shorten the actuating collar so the marker actuates sooner in the pull. So go ahead and turn the collar clockwise (depending on how you are looking, turn it as though you are trying to screw it on further). After every fine adjustment pull the trigger and check to see if it is shooting soon enough in the pull. If not, keep turning until you find the proper spot. When you're done with that tighten that set screw back up.
The marker is shooting too early or late
Firing too early:
If the marker is shooting sooner then the 1/4 to 1/2 length of the trigger pull then we are going to want to get it shooting a little later so we don't have firing problems. To do so; Have the marker uncocked then move your bolt and stick a 1/8" allen key inside the hole located on the top of the marker, just behind the feedtube. Once you have the allen key in, you may need to wiggle the cocking rod a little bit in order for the allen key to reach to the head of the lug. Once you have gotten the allen key in the lug, you are going to turn the allen key counterclockwise so the lug rests lower on the sear. This will cause the marker to not shoot till later in the pull. The amount you turn depends on how soon the marker is firing.
Firing too late:
If the marker is shooting past the 1/4 to 1/2 length of the trigger pull then we are going to want to get it shooting a little sooner so we don't have conflicts between the marker trying to shoot and the actuating. A good sign but not the only sign would be that your marker is "farting." To do so; Have the marker uncocked then move your bolt and stick a 1/8" allen key inside the hole located on the top of the marker, just behind the feedtube. Once you have the allen key in, you may need to wiggle the cocking rod a little bit in order for the allen key to reach to the head of the lug. Once you have gotten the allen key in the lug, you are going to turn the allen key clockwise so the lug rests higher on the sear. This will cause the marker to shoot sooner in the pull. The amount you turn depends on how late the marker is firing.
Quote:
If you have any comments or suggestions (or see any of my multiple typos) feel free to send me a PM so I can fix that. With any luck you have been able to successfully time your autococker. Wasn't so bad now was it? 
-Reaper22
|
|

|

|
 Sponsored Links
|
Remove Advertisement
|
|
Advertisement
|
|
|
04-06-2005, 06:09 PM
|
#23
|
|
ALL GLORY TO THE HYPNOTOAD
Join Date: Dec 2002
Location: Chapel Thrill, NC
|
I finally got around to typing out a diatribe on oils...
"On the question of lubrication
There are essentially three types of lubrication used in paintball today. The first (Type 1) is thin, liquid lubes like AGD Autolube, KC Troublefree, Gold Cup, and the like. The second (Type 2) are lubes which are thick and viscous, like Vaseline or Slick Honey. The third group (Type 3) is roughly in the middle; they are goopy but thinner in consistency than Vaseline lubes like Dow 33 (Shocker lube) fall into this category. Any oft-asked question is which type (or types) of lube to use on an autococker.
First, let us discuss why an autococker needs lubrication in the first place. As we know, only the moving parts of a gun require lube; stationary parts generally do not need significant lubrication to accomplish their task. Further, only moving parts which have a contact interface with another part must be lubricated (ie, you dont have to smear the back block with grease because it doesnt contact any other parts as it moves). In a cocker, the bolt, hammer, 3-way shaft, and ram shaft are the moving parts which fit this bill. Additionally, other smaller moving parts need lube, like the regulator pistons, valve stem, etc.
First let us consider the hammer. In the olden days of autocockers, hammers were crudely made. However, in modern times, they are produced on powerful CNC lathes and come off the machine with a near-mirror finish. Similarly, the interior of the hammer tube is quite well-polished in modern guns. The hammer runs under very little load in a low-friction environment, but its function is such that it needs to have very consistent motion (a hammer which moves inconsistently will cause inconsistent air bursts and velocities). Following this line of logic, it would be foolish to use a lube that gunks up the hammer tube and impedes the motion of the hammer. Thus, a thin, Type 1 lubricant is best suited toward use on the hammer. That said, the hammer runs under very small load, and in the large majority of autocockers, no hammer lubrication is necessary at all. If you feel you must lubricate the hammer, a thin, liquid lubricant is best.
Next let us consider the bolt. Like the hammer, bolts must be able to move at high speed. Thus it stands to reason that a thick, viscous Type 2 lubricant would be unsuited for bolt use. Thus, the bolt is also suited to a thin, liquid lubricant. Note that lubrication is often not needed with todays delrin bolts. However, if your bolt has any o-rings (regardless of the bolt material), they must be lubricated, and a thinner oil is best.
Next comes the ram shaft. The ram must be capable of very fast motion. Following the same logic as before, the ram is best lubed with a thin, Type 1 lubricant so that it may function as fast as possible.
The 3-way shaft is more open to interpretation. Its motion is directly linked to the motion of the trigger finger and it does not need to move especially fast in todays modern short-throw 3-ways. In this case either Type 1 of Type 2 lubes may be used, depending on the desired outcome. As weve established, Type 1 is more conducive to fast motion without hindrance. If one desires to feel no input from the 3-way as the trigger is pulled, a Type 1 thin lube is best. However, Type 2 lubes are thick, like axle grease. They are suited to smoothness while they slow the piece down somewhat in its ability to move quickly, they also have a buttery quality which is favorable for trigger use. Thus, a Type 2 lube will aid in the creation of a buttery trigger pull, and a thin lube will aid in creating a light trigger pull. A good compromise between the two, if a compromise is desired, would be a Type 3 lube like Dow 33.
These parts are the only ones that require specific lubrication. It is also desirable to lube the system as a whole by putting some lubricant in the ASA adapter and dry firing the gun. Clearly a Type 1 lubricant is best; anything thicker will not properly travel through the marker.
There is also the question of which brands are best. In general, one should avoid petroleum-based lubricants as they have the undesirable property of degrading neoprene/buna-N/rubber o-rings. Polyurethane rings are safe from petroleum, but what if your marker has a neoprene o-ring somewhere inside? Youll hear stories on both sides of the issue some say theyve used petroleum products for years with no trouble, others say they used it and it ate their o-rings. The simple question is, why risk it? Non-petroleum products are available with equal performance at equal cost, so why not err on the side of caution? Additionally, petroleum products have the unfortunate effect of attracting dirt anything lubed with petroleum products will need to be cleaned and re-lubed with good regularity. Thus it is my recommendation that you avoid anything petroleum-based: Vaseline, 3-in-1 Oil, WD-40, and the like.
For Type 1, any synthetic oil is good, and those specifically designed for paintball are the best. The top brands are KC Troublefree and Gold Cup. In a pinch any synthetic low-weight air tool oil will work. For Type 2, Vaseline, Slick Honey, and plain-old grease are the only easily-available choices, and all are petroleum-based. Use at your own risk. Finally, Type 3 lubes are dominated by Dow 33, aka Shocker Lube, which is available at most paintball retailers and works well. The only downside is its tendency to dry out and crumble into powder, so parts lubed with it will need to be periodically cleaned and re-coated. I have run all my cockers with Type 1 lubricants exclusively and never once experienced a lube-related problem."
CQ
|
|
|
|
|
04-19-2005, 05:30 PM
|
#24
|
|
They call it...
Join Date: Jan 2005
Location: Spokane, WA
|
LOOSE THREADS TIP.
i know we all hate loose threads, so, just coat the front of the peice you are screwing in that has been known to back out (like the timing rod collar nut, or the set screw on your cocking rod) in some clear-coat nail polish. The clear coat polish will dry, sticking together the two peices and holds them there, but is easy enough to remove without a hassle, unlike loctite. loctite is good for sealing things permanently, but when you want to stick two peices together for a little but, clear coat nail polish is better, and usually less expensive for the amount you need. And! as an added bonus, you can lend it to your little sis in exchange for not messing with your precious autococker. preventing your sweetspotted lpr or your perfect timing for getting out of whack.
thats my two cents
steve
__________________
"Originally posted by Potz4Prez: Yeah... But there's always a chance... And if you dress gay, guys will buy you drinks ;)"
MetDTHero: I've never been sigged...
NoBounce_Mid: I am gay. rawr. ;)
cynicalrider: justyna, the one pat met, is naturally busty. i just called my cousin busty.
F1VENOM: tranny's are fun. :P
dervishboy05: Oh my tranny is ****ed.
rdm3000: I just give no ****s
|
|
|
|
|
06-06-2005, 09:27 AM
|
#26
|
|
The voices say I'm normal
Join Date: Apr 2001
Location: Rochester NY
|
|
|
|
|
|
06-08-2006, 11:53 PM
|
#27
|
|
¯\(º_o)/¯
Join Date: Dec 2004
Location: Kennewick, WA
|
cockerstars 4 step guide to a lighter and smoother trigger pull with a slide frame
1.lightend springs all around in the frame (makes the pull lighter since there is less force to pull aginst. madman kit is wonderful. should be the first up to any cocker)
2.roller sear (will let the trigger plate roll off the sear via a bearing instead of the traditional sliding off of the sear. imagine pushing something off of a cliff vs rolling it over a giant wheel)
3.rounded lug in hammer (helps exentuaite the roller sear effect)
4.polish trigger plate to a mirror shine (reduces the drag coffecient of the plate moving in the frame. if i have all the time in the world i also put a SMALL dab of vasaline on the plate before i go to the field to enhance this concept. rember to wipe the plate clean after each day of play.)
5. set trigger stops if applicable (this will eliminate any excess pull after the gun has fired and acuated. be sure all of your timing is nice and tight before you do this.)
__________________
.
1971 240Z, 1969 Camaro, 1972 240Z, 1973 240Z, 1979 280ZX
Prairie: "Don't respect me: I still rape little children."
R.I.P. Kylie Nichole Rock July 6th 1990 - August 30th 2006
XxHat3d1xX: "I don't even need the Rambo knife or Camo Paint, the sight of me in a loin cloth can kill any animal known to man."
trust
Last edited by cockerstar : 06-10-2006 at 02:31 PM.
|
|
|
|
|
07-26-2006, 12:05 AM
|
#29
|
|
Join Date: Sep 2004
Location: NW WA
|
i dont know if this has been posted or not, so here it goes
a difrent way to time your cocker! this will only be usefull for guns withthe lug adjustment hole
i do however take no responsibilty if you hurt your self or another, or damage anything in any way, by doing what is described here!
time your marker just like all the other guides say, in regareds to your back block, cocking rod, and lpr.
but instead of adjusting your lug first, adjust your 3-way
i find its easyest to adjust it so it is about to start hising at rest, this gives you the shortest possible cocking point, and depening on your 3-way this maybe very short!
an easy way to do this is to remove your cocking rod, and set your 3 way up to cock sooner and sonner in the triger pull until it is hissing at rest, then adjust it back to the point where it is about to hiss at rest
note: the hissing is the point where air is starting to be vented from the ram
now that we have that done, onto your hammer lug!
now, we do the true "timing" of the gun with this. start by setting your fire point about half way between rest and when your cocking point is. from there you can legthen the lug (screwing it towards yourframe) to tighten your timing( reduce the amount of time bewteen fire and cocking) keep tighting the timing until you start to see some blowback(then lossen the timing to remove it) or until you have problems with the marker notfiring with slow triger pulls,
once you have a rough idea as to what is going on, you can use any troubale shooting guides for iming, an instead of adjusting your timing rod, simple adjust the sear, if the FAQ page your looking at tells you to have the marker cock later, simple make your marker fire sooner. and if the help guide is telling you to have the gun cock sooner, make your gun fire later.
this alows you to keep the shortest pull you can have, while still being able to time and fix things! jsut rember to tighten up any triger stops to take advatage of your shoter pull!
i hope that makes sense, if you spot any bad spelling errers PM wit hthem (dont want to clater this thread) and ill edit this ASAP
i hope this helps some!
-levi
|
|
|
|
|
07-06-2007, 09:53 PM
|
#30
|
|
BEO Mafia
Join Date: Jan 2006
Location: Maryland
|
Quote:
Originally Posted by A.C. Basbas

Anybody know what the frontblock threading is on the 99 vs the 2k?
|
Pre-2K= 3/8" 24TPI
2K+= 9/16" 24TPI |
|
|
|
|
07-26-2008, 03:40 AM
|
#31
|
|
Join Date: Jun 2008
Location: Currently moving to Cali
|
Quote:
Originally Posted by PI_Ice
could anyone explain the main differences between pre and post 2k cockers?
|
Main differences as per my own observations and also owning an older model.
Old vs. New
~ 45* feed vs. center/vertical feed
~ Small Front Block Bolt vs. Larger Front Block Bolt (also known as a banjo bolt)
(also, you can sometimes find the banjo bolts with built in air expansion chambers in the older ones)
~ Small front internal cavity vs. Larger front internal cavity
~ Thicker back block vs. Thinner back block
~ Very long bolts vs. Shorter bolts
~ 2 holes through center of vertical ASA vs. 3 holes through center of vertical ASA
~ Without going into overboard detail - there were differences in what parts were used in the RAM and how they attached exactly
~ The old trigger plate had a sharp point on the back end of it vs. a more thicker rounded end where the sear slides along
~ Without going into overboard detail - there were differences in what parts were used in the Inline Regulator
~ Because of the front block bolt differences the same applies to the front blocks as well... the old front block hole in the middle is smaller than the one in the newer versions
~ Old models have no IVG threads made into the body vs. newer models have IVG threads in the body - the old ones use a sort of small IVG nut inside of a sleeve, at least on mine it is like that and it requires a screw underneath the back of the body where you would install a Beaver tail to hold it in place
If you really want real accurate differences only between the PreY2K and Y2K+ markers... I need to know more about which two markers are you comparing exactly. Cheers! Hope this helps some... these are most of the differences that I have observed and is by no means necessarily a complete list... but I think I covered most everything. |
|
|
|
|
08-15-2011, 08:45 AM
|
#32
|
|
Join Date: Dec 2010
Location: Alabama
|
To supplement mnt's diagram of the regulators, here are the sizes of the o-rings needed for a WGP hpr rebuild:
regulator piston - #10
piston stem - #36
#30 goes between upper cap and middle piece, #10 between lower cap and reg body, #35(standard tank o-ring) on the top.
Will update with info for Jackhammer 2 lpr once i get it taken apart later this week.
Last edited by chasethebarber : 08-16-2011 at 05:47 PM.
Reason: Accidentally have wrong info.
|
|
|
|
|
11-03-2011, 09:37 PM
|
#33
|
|
N.O. Bounty
Join Date: Dec 2005
Location: Baton Rouge, LA
|
ok so i just figured out a great way to remove a cocker valve if you dont have the tool ... all you need is a stock wgp cocking rod and a socket set.
Take the cocking rod ( it has to be the one with the hex shaped back), remove the set screw from the inside of it, and unscrew the cocking rod from it , then just drop it into the valve retaining lug and put a socket over it ,and unscrew it , the back of the cocking rod fits perfectly , no need for the removal tool ... i was psyched when i figured this out , haha
|
|
|
|
|
01-31-2012, 12:03 PM
|
#34
|
|
The voices say I'm normal
Join Date: Apr 2001
Location: Rochester NY
|
Quote:
Originally Posted by addicted2dunes
Dead site
|
Yup, I shut down MPP about 3 years ago..
..
The articles should still be hosted on customcockers.com |
|
|
|
|
02-04-2012, 07:50 AM
|
#35
|
|
Big mech clackin
Join Date: Jan 2002
Location: DMV
|
Quote:
|
Originally Posted by vantrepes
Yup, I shut down MPP about 3 years ago..
..
The articles should still be hosted on customcockers.com
|
Thanks Vantrepes. Good to see you around. Your site was the go to back in the day! pulling my 2k2 custom mech out of a 6 year break from play and your articles always bring me up to speed
__________________
Custom WGP 2002 Blue Autococker
|
|
|
|
|
04-10-2012, 07:13 PM
|
#36
|
|
.
Join Date: Jun 2011
Location: socal
|
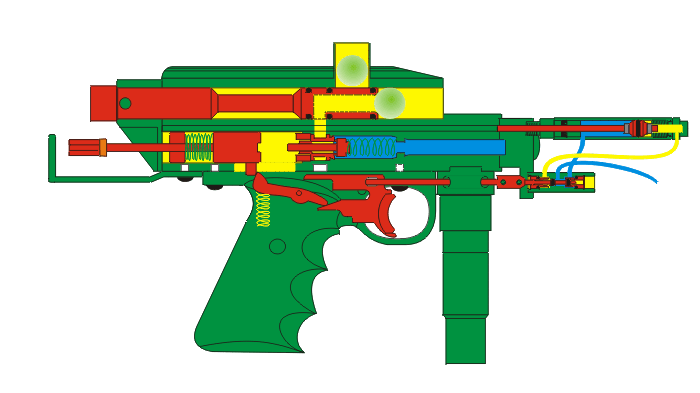
I like this. not sure if I can post it but it best demonstrated to me the operation of my cocker.
take it down if you like.
credit should be given to zdspb.com a great site
__________________
in the heat of battle the fire of God fills you
Last edited by Demo2222 : 04-10-2012 at 07:25 PM.
|
|
|
|
|
04-22-2012, 09:36 PM
|
#37
|
|
Cocker Junkie to the Bone
Join Date: Feb 2012
Location: Central PA
|
HELP!!!
I am rebuilding an old Mini Cocker & I am still getting leaks from the 3 way where it threads into the front block.
What's been done:
Slider Frame
stripped it down and cleaned, checked replaced every o ring, reset the sear lug timing, replaced the hoses with new ones, cleaned the RAM, the LPR does not come apart (yes I tried every way possible), got a new adjustable LPR from ANS.
I am using a Palmer's Stabilizer as a HPR.
The gun fires fire and cocks fine but I am getting air leaking from the threads of the 3 way where it screws into the front block. I have a slider frame. So I move the 3 way closer to the front block to seal it up?
Thank you for any help.
|
|
|
|
|
04-27-2012, 01:01 AM
|
#38
|
|
|
first, you should use a new thread. this thread is mainly for information purposes only.
I would suspect you would need to lube the o-rings, and adjust the timing rod little by little, having the shaft go forward and more into the 3way
|
|
|
|
|
08-08-2012, 02:31 PM
|
#39
|
|
|
I was looking to put some upgrades on my Trilogy Comp. It's my 1st Autococker so I'm not too fluent with the parts.
I was wanting to get new grips. I looked everywhere and couldn't find anything saying if they're 45 or something else.
I also wanted to change out the reg. What I really want is a LPR that is at least externally adjustable and preferrably one that has a gauge.
The last thing I was wondering is if it is possible to get an on/off ASA installed.
|
|
|
|
 Posting Rules
|
You may not post new threads
You may not post replies
You may not post attachments
You may not edit your posts
HTML code is Off
|
|
|
|


 Your Privacy Choices